Orange Sour Cream Cake with orange icing, to be specific. No, not my recipe, but I've been eating a lot of it lately, and it's really good but it needs a couple tweaks. Plus, I feel like if I don't post something now, I'm just going to keep procrastinating and then it'll be almost a year later before I post something again. It's not that I don't have stuff that I can write about here- oh, I've got stuff, alright; really tasty stuff. But I've been busy, and I procrastinate a lot. Hopefully once I get into my new apartment things will get better. And hopefully I'll have better lighting. The lighting here sucks. Anyway, back to the cake.
I took a couple photos of mine, which I'll add here later but not right now, but here's their recipe-
Orange Sour Cream Cake
3 cups all-purpose flour
1/2 tsp. salt
1 tsp. baking soda
1 tsp. vanilla
8 oz. butter
1 1/2 cup sugar
3 large eggs
1 cup sour cream
1/2 cup fresh orange juice
3 tablespoons fresh orange zest
Orange Icing
1 1/4 cups powdered sugar
1 tsp. zest
2-3 tablespoons orange juice
Preheat oven to 350, prepare pans by greasing them and dusting with flour.
For the cake, begin by creaming together the sugar and butter. Slowly add the sour cream, eggs and vanilla until thoroughly combined. In a separate bowl, sift together the dry ingredients. Slowly add dry ingredients, mix until smooth. Add orange juice and zest, mix to combine. Place into prepared pans. If baking in 1 pan, bake for about 1 hour or until cake tests done. If baking in 2 pans, bake for about 30-35 minutes or until cakes test done.
Not much need be changed, but my version ended up with an extra half-cup or so of sour cream by accident- not sure if it affected it for better or worse, but if anything, I suspect it was for the better. But the main modifications that I made were these-
Where it calls for orange juice- try substituting orange juice concentrate, instead. I made it according to the original recipe the first time (minus the zest, because I'm just not a zest fan, really) and while it was good, and orange-y even, it wasn't orange-y enough. Trust me, use the concentrate. Also, even though I left out the zest (well, I did add one orange's worth, which probably wouldn't even be noticeable) I did happen to find some dried orange peel that I bought awhile ago and forgot I had, so I added a whole bunch of that! I don't remember how much, maybe half a cup? Third of a cup? Something like that. Actually, I think what it was, was a quarter of a cup to slightly less than half of the cake mix- to compare one with and one without, I divided it into two cakes, one being larger than the other, and added the quarter cup to the smaller one; so it would've ended up being something like a half-cup total. Or something like that. It was a lot, that's all I know. And after comparing the two, the one with the dried orange peel was clearly the winner in taste. Much more orange flavor. I'm not sure how much flavor difference there is between dried orange peel and fresh orange zest, but I'm guessing the d.o.p. is a lot more concentrated. Not to mention a lot less work than the zest. So I highly recommend buying that and using it instead of the zest. Then again, I'm biased because I really didn't use (much) zest at all. Still, that's my game plan from here on out.
Orange icing...
Hmmm... what to say..? Again, I left the zest (and this time, also the d.o.p.) out of this one, so I don't know how much of a difference it would have made, but I gotta say, the recipe as they have it here- 1 1/4 cups of powdered sugar to 2-3 T o.j.? Waaay to overpoweringly sweet. I couldn't do it. Just couldn't do it. I tweaked it a lot and messed around with it aplenty, and in the end I just ended up going with 1. a bunch of powdered sugar, 2. a pinch of salt, 3. o.j. concentrate, and 4. fresh squeezed lemon juice (about half a lemon). Basically I started with the sugar in a bowl, added the salt, then kept adding the concentrate until it got to about the consistency I wanted. Then added some lemon juice for balance. It was pretty good too, actually. But I think next time I'm just going to try out some straight o.j. concentrate; maybe add a pinch of salt (and a pinch of baking soda to counteract the acidity) but not much else.
Overall, this cake is delicious and very much worth your time. And the author was right- it does make a perfectly good (great, in my opinion) breakfast. Give it a try!

Because recipes are for jerks.* (Some thoughts on food; and other stuff.)
Tuesday, May 25, 2010
Tuesday, April 13, 2010
My Big Food Blogger Rant
(I was going to tack this on as part of another post, but I decided it warrants a separate post all on its own.)
I read a few food blogs regularly, and am always scanning for new ones, so I've read a great many food blogs over the last couple years, and one thing that completely irritates the pants off of me is the absolute overkill of step-by-step photos. You know what I'm talking about. And probably you already have in mind one or two food bloggers who do it constantly. You know, the photo showing the bowl of flour that you have to mix the baking soda into, with the teaspoon full of baking soda hovering over it waiting to be dropped in- 'Now I'm getting ready to add in the baking soda! Now I'm actually adding it in! [new photo, showing it falling in] Now I'm tap-tap-tapping the spoon on the edge of the bowl! [new photo showing the tap-tap-tap] Now I'm setting the spoon on the counter with the other dirty utensils! [new photo showing the dirty utensils] Now I'm reaching for the wire whip!' [New photo...] And so on, and so on, and so on, with one photo after another showing each. and. every. little. unnecessary. step; utilizing a dozen photos when one or two at most will suffice. Should some freak miracle occur and this post somehow finds its way to a food blogger or two who does that sort of thing, I would just like to say this:
Please. Stop.
It's unnecessary, at best. It hurts the readers' eyes. It doesn't add anything to the post. You can do better. You know who you are.
Monday, March 29, 2010
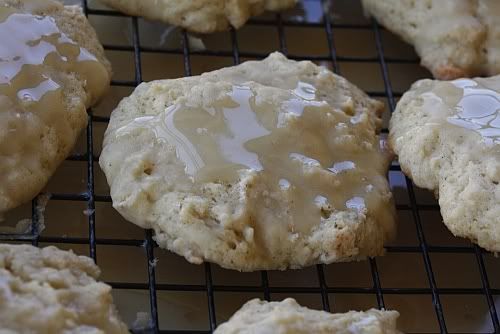
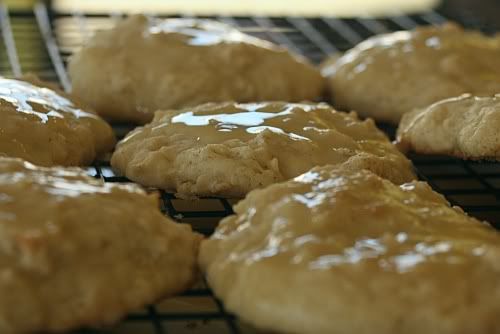
Lemon-Cardamon-Buttermilk Cookies
...with lemon-buttermilk-vanilla glaze.
Dang, those just sound good, don't they? They do to me, anyway. Because I really, really like cardamom. (And they are good. I highly recommend that you try them.)
Basically this is a slight modification of the Buttermilk Cardamom Cookie recipe I found over on Sugarcrafter. As I mentioned in the previous post, I misread the recipe and thought they were lemon-buttermilk-cardamom cookies, and as a result, ended up with several pounds of Meyer lemons, one or two of which I ended up using in the recipe. I also used powdered buttermilk, instead of liquid for this recipe, including the glaze. Oh, and speaking of buttermilk, here's my understanding of it: buttermilk- the real kind- is the liquid that separates from the solid when you're making butter. It's not sour at all, like the stuff you buy in the carton at the store. That stuff is, as I understand it, cultured skim milk (I'm not exactly sure what kind of culture it is, though). And the powdered buttermilk is basically just that- the real buttermilk in powdered form. I haven't really used it a lot in baking or cooking, so I don't know how it compares to the liquid stuff, but I plan to use it a lot more whenever a recipe calls for the liquid kind, as it keeps for a whole lot longer. Most of the time when I've used the liquid stuff in the past, I end up throwing half of it out due to it being past the expiration date. Anyway, let's make some cookies!
Over on Sugarcrafter, she wrote that several people told her, “These are…different.” Now, when people say that I take it to mean that they don't like what they're eating, but they don't exactly dislike it, either. Mostly they're just not sure what to make of it. I haven't tried the recipe in it's exact original form, only my modified version, and I have to say, these are different, but in a really good way. I really, really like these cookies, and will definitely make them again (maybe even today or tomorrow) and would make them for friends too. They are, as SC says, 'soft and fluffy, almost cake-like,' which I didn't think I'd like at first because I prefer my cookies a little more crumbly, but after the first cookie, I really got hooked on them. They reminded me of some sort of fast food/gas station type of coffee cake pastry, only better, which led me to later try a sprinkling of cinnamon on top. The result? Success! (Makes me feel a little better about having forgotten the candy sprinkles.)
Here's the original recipe-
Cookie:
My main modification to the cookie part was that I increased the amount of cardamom. I just eyeballed it, but I think it was about 1 1/4- 1 1/2 t, and of course, the powdered buttermilk and Meyer lemon juice- so instead of 5 T liquid buttermilk, I used 1 T powdered + 1/4 c. Meyer juice, + 1 T water (I'm sure 5 T juice would've been fine, but since it was my first time making it, and using Meyers in general, I wanted to be a little careful. Looking back, it's not like 1 T is going to push things overboard, I know).
For the glaze, it just seemed like way too much for the amount of cookies, so I cut it in half. And in reality, if you make the glaze using the amounts in the original recipe, you will have a whole lot left over- but that's not a bad thing at all, since I found myself using what little glaze I had leftover to dunk my cookies in, all the while wishing I hadn't halved the recipe. So I don't recommend cutting it in half. But I did, and here's kind of how it went-
1c powdered sugar
1t powdered buttermilk
1 1/2T Meyer lemon juice
1t double-strength vanilla extract
You might be thinking that a whole teaspoon of double-strength vanilla could be too much for a half-order of the glaze recipe. You might be right. It's not that the vanilla flavor was too strong- I love that flavor- but the alcohol part of it was a little too strong. Don't get me wrong, I like my alcohol too, but it didn't really work in this case. So I had to do a little bit of reworking- not a problem really, I think this is where I'm best- adding and tasting, and adding again until it tastes the way I want it to. But of course that makes it hard to come up with an actual recipe to post somewhere or share with friends, since I don't really measure any of it out. I think I ended up adding about another tablespoon of buttermilk powder, and the juice of a whole Meyer. Possibly a little more powdered sugar too, I can't remember. But anyway, here's the thing- it's super easy to make and hard to mess up. Skip the actual recipe- just use it as a guideline:
Powdered sugar
Powdered buttermilk
Meyer lemon juice
Vanilla extract
Mix it all up in whatever proportion tastes right to you. That's generally how I do it, and that's what I plan on doing next time. One thing to note, and you can kind of see this in the photo, is that the powdered buttermilk, being sort of an off-white color, has the unfortunate effect of making the glaze look like a glaze of a whole different kind. It's especially bad when you have it all over your fingers after swirling your cookie in a plate of leftover glaze, but try and overlook this when you're eating these cookies.
By the way, here's a recap with my changes, along with the rest of the recipe:
Cream the butter and sugar together.
Add in the egg.
In a large bowl, whisk together the flour, baking soda, cardamom, and salt.
Add the buttermilk and flour mixture to the butter mixture gradually.
Drop on a lightly greased baking sheet and bake on 375 F for about 10-12 minutes, then let cool on a rack before adding the glaze/sprinkles (don't forget to try them with a dusting of cinnamon!)
Dang, those just sound good, don't they? They do to me, anyway. Because I really, really like cardamom. (And they are good. I highly recommend that you try them.)
Basically this is a slight modification of the Buttermilk Cardamom Cookie recipe I found over on Sugarcrafter. As I mentioned in the previous post, I misread the recipe and thought they were lemon-buttermilk-cardamom cookies, and as a result, ended up with several pounds of Meyer lemons, one or two of which I ended up using in the recipe. I also used powdered buttermilk, instead of liquid for this recipe, including the glaze. Oh, and speaking of buttermilk, here's my understanding of it: buttermilk- the real kind- is the liquid that separates from the solid when you're making butter. It's not sour at all, like the stuff you buy in the carton at the store. That stuff is, as I understand it, cultured skim milk (I'm not exactly sure what kind of culture it is, though). And the powdered buttermilk is basically just that- the real buttermilk in powdered form. I haven't really used it a lot in baking or cooking, so I don't know how it compares to the liquid stuff, but I plan to use it a lot more whenever a recipe calls for the liquid kind, as it keeps for a whole lot longer. Most of the time when I've used the liquid stuff in the past, I end up throwing half of it out due to it being past the expiration date. Anyway, let's make some cookies!
Over on Sugarcrafter, she wrote that several people told her, “These are…different.” Now, when people say that I take it to mean that they don't like what they're eating, but they don't exactly dislike it, either. Mostly they're just not sure what to make of it. I haven't tried the recipe in it's exact original form, only my modified version, and I have to say, these are different, but in a really good way. I really, really like these cookies, and will definitely make them again (maybe even today or tomorrow) and would make them for friends too. They are, as SC says, 'soft and fluffy, almost cake-like,' which I didn't think I'd like at first because I prefer my cookies a little more crumbly, but after the first cookie, I really got hooked on them. They reminded me of some sort of fast food/gas station type of coffee cake pastry, only better, which led me to later try a sprinkling of cinnamon on top. The result? Success! (Makes me feel a little better about having forgotten the candy sprinkles.)
Here's the original recipe-
Cookie:
- 1/2 cup sugar
- 1/4 cup Butter
- 1 egg
- 1 1/4 cups flour
- 1/4 tsp baking soda
- 1 tsp ground cardamom
- 1/4 tsp salt
- 1/4 cup + 1 Tbsp buttermilk
Vanilla glaze:
- 2 cups powdered sugar
- 3 Tbsp buttermilk
- 1 tsp vanilla extract
My main modification to the cookie part was that I increased the amount of cardamom. I just eyeballed it, but I think it was about 1 1/4- 1 1/2 t, and of course, the powdered buttermilk and Meyer lemon juice- so instead of 5 T liquid buttermilk, I used 1 T powdered + 1/4 c. Meyer juice, + 1 T water (I'm sure 5 T juice would've been fine, but since it was my first time making it, and using Meyers in general, I wanted to be a little careful. Looking back, it's not like 1 T is going to push things overboard, I know).
For the glaze, it just seemed like way too much for the amount of cookies, so I cut it in half. And in reality, if you make the glaze using the amounts in the original recipe, you will have a whole lot left over- but that's not a bad thing at all, since I found myself using what little glaze I had leftover to dunk my cookies in, all the while wishing I hadn't halved the recipe. So I don't recommend cutting it in half. But I did, and here's kind of how it went-
1c powdered sugar
1t powdered buttermilk
1 1/2T Meyer lemon juice
1t double-strength vanilla extract
You might be thinking that a whole teaspoon of double-strength vanilla could be too much for a half-order of the glaze recipe. You might be right. It's not that the vanilla flavor was too strong- I love that flavor- but the alcohol part of it was a little too strong. Don't get me wrong, I like my alcohol too, but it didn't really work in this case. So I had to do a little bit of reworking- not a problem really, I think this is where I'm best- adding and tasting, and adding again until it tastes the way I want it to. But of course that makes it hard to come up with an actual recipe to post somewhere or share with friends, since I don't really measure any of it out. I think I ended up adding about another tablespoon of buttermilk powder, and the juice of a whole Meyer. Possibly a little more powdered sugar too, I can't remember. But anyway, here's the thing- it's super easy to make and hard to mess up. Skip the actual recipe- just use it as a guideline:
Powdered sugar
Powdered buttermilk
Meyer lemon juice
Vanilla extract
Mix it all up in whatever proportion tastes right to you. That's generally how I do it, and that's what I plan on doing next time. One thing to note, and you can kind of see this in the photo, is that the powdered buttermilk, being sort of an off-white color, has the unfortunate effect of making the glaze look like a glaze of a whole different kind. It's especially bad when you have it all over your fingers after swirling your cookie in a plate of leftover glaze, but try and overlook this when you're eating these cookies.
By the way, here's a recap with my changes, along with the rest of the recipe:
- 1/2 cup sugar
- 1/4 cup Butter
- 1 egg
- 1 1/4 cups flour
- 1/4 tsp baking soda
- 1 1/4-1 1/2 tsp ground cardamom
- 1/4 tsp salt
- 1 Tbsp powdered buttermilk + 5 T Meyer lemon juice
Cream the butter and sugar together.
Add in the egg.
In a large bowl, whisk together the flour, baking soda, cardamom, and salt.
Add the buttermilk and flour mixture to the butter mixture gradually.
Drop on a lightly greased baking sheet and bake on 375 F for about 10-12 minutes, then let cool on a rack before adding the glaze/sprinkles (don't forget to try them with a dusting of cinnamon!)
Monday, March 22, 2010
Oh My(er)...
All I wanted was a lemon. Just one. Just a regular one. It was for a lemon-cardamom cookie recipe that I'd found that I wanted to try out (Oh, and cardamom? I love that shit! I only recently started using it, but I now use it a lot. Got a couple cool recipes using it that I plan on posting on here, too). So today on my way home from a short jog, I stopped in the little grocery store around the corner from my house and as I was walking by the 'Reduced for quick sale' cart that was right across from the regular lemons, all it took was a split-second glance-
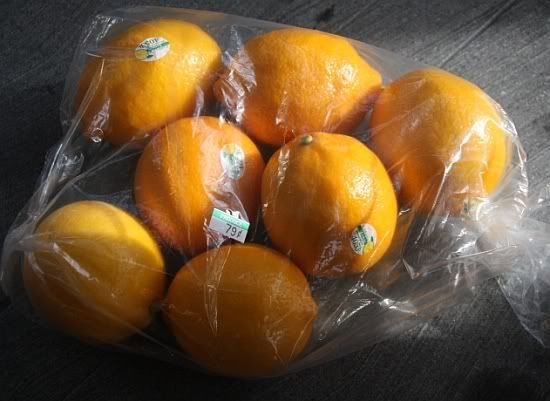
"Holy crap, are those Meyers? In the 'Reduced for quick sale' cart?" Why, yes. Yes they were Meyer lemons. Several bags of them, with several lemons each (7, I found out later) all for the unbelievable price of 79 cents per bag. I grabbed 3 bags right up without a thought. It's not like I needed them. But for that price, I wasn't going to turn them down. No way. Especially not after I bought over 2 kilos a couple weeks ago at another grocery store because they were clearly marked as being 99 cents/lb. but when I looked at my receipt the following week, after I had already cut them all up for preserved lemons, I found out that I actually paid $3.99/lb. Which was an average price, I guess, but I probably wouldn't have bought so much if I'd known that. Anyway, I've been really getting into preserved lemons a lot lately. They're all the rage these days. Haven't had a chance to try any of them out yet, but I've been making a lot of them. I already have a couple 'regular' jars-
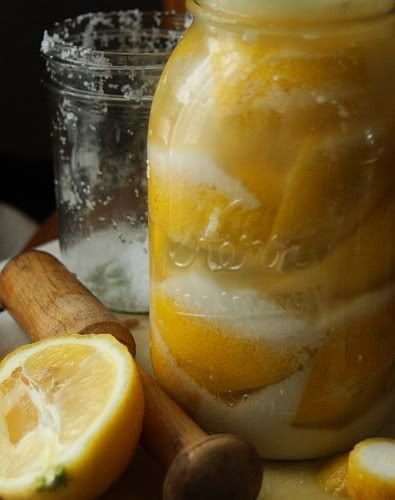
...and a single jar of the spiced kind, plus two jars of preserved myers. Now I have about 20 more Myers that I need to use. No hay problema, I'll figure something out. Probably preserve them (in a big-ass pitcher, since I'm out of jars).
The funny part of this all is that if I'd actually read that cardamom-lemon cookie recipe at some point before leaving the house today, I'd have seen that it didn't even call for lemons- because it was actually for buttermilk-cardamom cookies! Well, I actually did read it (awhile ago) and she mentions lemon flavor a few times in it- from the buttermilk- so I guess I just remembered it wrong when it came time to go to the store. So, big oversight on my part results in big Meyer lemon windfall, yay! Here's the recipe that I used for the buttermilk-cardamom-lemon cookies. I modified mine slightly- added more cardamom, (because I love that shit!) used powdered buttermilk instead of the liquid kind, but also Meyer lemon juice instead of just plain water for rehydrating the the buttermilk powder. Also used Meyer lemon juice in the glaze. Haven't tried them yet. I'll report back here when I do.
"Holy crap, are those Meyers? In the 'Reduced for quick sale' cart?" Why, yes. Yes they were Meyer lemons. Several bags of them, with several lemons each (7, I found out later) all for the unbelievable price of 79 cents per bag. I grabbed 3 bags right up without a thought. It's not like I needed them. But for that price, I wasn't going to turn them down. No way. Especially not after I bought over 2 kilos a couple weeks ago at another grocery store because they were clearly marked as being 99 cents/lb. but when I looked at my receipt the following week, after I had already cut them all up for preserved lemons, I found out that I actually paid $3.99/lb. Which was an average price, I guess, but I probably wouldn't have bought so much if I'd known that. Anyway, I've been really getting into preserved lemons a lot lately. They're all the rage these days. Haven't had a chance to try any of them out yet, but I've been making a lot of them. I already have a couple 'regular' jars-
...and a single jar of the spiced kind, plus two jars of preserved myers. Now I have about 20 more Myers that I need to use. No hay problema, I'll figure something out. Probably preserve them (in a big-ass pitcher, since I'm out of jars).
The funny part of this all is that if I'd actually read that cardamom-lemon cookie recipe at some point before leaving the house today, I'd have seen that it didn't even call for lemons- because it was actually for buttermilk-cardamom cookies! Well, I actually did read it (awhile ago) and she mentions lemon flavor a few times in it- from the buttermilk- so I guess I just remembered it wrong when it came time to go to the store. So, big oversight on my part results in big Meyer lemon windfall, yay! Here's the recipe that I used for the buttermilk-cardamom-lemon cookies. I modified mine slightly- added more cardamom, (because I love that shit!) used powdered buttermilk instead of the liquid kind, but also Meyer lemon juice instead of just plain water for rehydrating the the buttermilk powder. Also used Meyer lemon juice in the glaze. Haven't tried them yet. I'll report back here when I do.
Tuesday, February 16, 2010
My most favoritest chicken sammich ever.
Oh hell yeah...
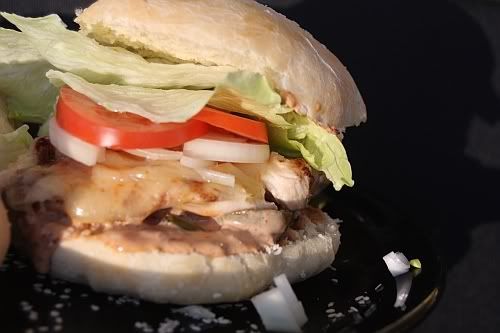
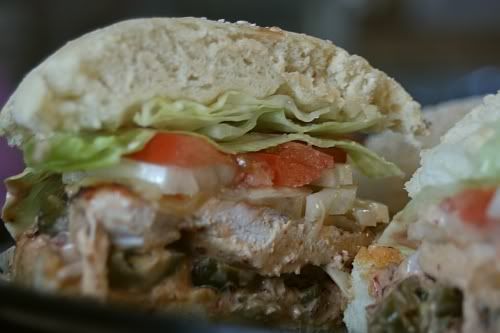
You see that? That's what a chicken sandwich should look like. Or a burger, for that matter. Pretty much any kind of sandwich. In fact, that's what a real sandwich does look like- messy; falling over; sesame seeds falling off; toppings spilling out. Not all perfect and cookie-cutter like the pics in chain restaurant menus and on tv. But whatever, we all know this already. So, let's talk about this sammich, shall we? I'm not sure who came up with it. But it's what we tend to eat at work most days. In fact, I eat it- on average- 4 days a week for lunch, and have been for at least the past year, and I'm not the least bit tired of it. Not even close. It's dead simple, too. So simple, in fact, that it doesn't even sound all that exciting or praise-worthy, or even worthy of a blog post. It almost sounds like an average chicken sandwich, albeit one with a little kick to it.
But it's not.
Ignore it at your peril. It's your loss if you do.
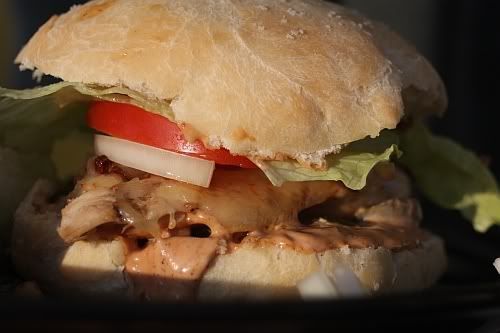
(check out that homemade bun action!)
But if you're interested, read on...
So like I said, I've been eating it an average of 4 days a week for lunch for at least the past year and am not the slightest bit bored with it. It's just so damn good. (Worth firing up the grill in the wintertime for, that's for sure!) And fairly quick and easy to make. All the ingredients are pretty much available anywhere. Homemade-bun-action is not necessary (I don't bother at work, but I've made them at home a couple times- I plan on doing a post on them here at some point). Ingredients are as follows-
Chicken breast
Lettuce, Tomato, Onion (LTO, as we say at work)
Nacho-sliced pickled jalapeños
Chipotle peppers in adobo sauce
Mayonnaise
Hamburger bun (Duh, right? But I've used plain old white bread before- a 'decent' quality, of course- when I didn't have any buns, and I have plans to use hoagie buns next. Mostly because I need to use them before I have to toss them.)
American cheese
And that's it. Now, I know a lot of folks turn their nose up at the lowly American cheese. And I know that it's sort of 'ghetto' in the foodie world. But it really works on this sandwich. It really does. Don't believe me? Go on, then. Try it and see. You'll be surprised. (C'mon, one time won't hurt. You know you want to.) Oh, and full disclosure here, the cheese used on the sandwich in these particular photos was Muenster. Muenster is one of my favorites (you should totally try it on pizza instead of Mozzarella!) but in the case of this sandwich, I actually prefer the American, I must say. I just used Muenster because I had it, and didn't have any American. Muenster rocks the grilled cheese sandwich, but for this sandwich, trust me- use American. Ok, let's put it all together...
First things first, though. You should really marinate the chicken in some sort of marinade, or at least brine it to help keep it tender and juicy. As far as a marinade goes, I really like this one, even though it was originally meant for steak. I tried it once with steak and didn't think it lived up to its name, but then again, I'm not much of a red meat eater anymore. Most of the meat I eat nowadays is chicken, so I tried it on that and liked it very much. But if you don't want to bother with making that up, then a simple brine of sugar/salt water does wonders. I usually dissolve 4-6 T each of sugar and salt (kosher, of course) per gallon of water and allow the chicken to soak in that for about an hour. Now when it comes to cooking, the chicken is really best grilled. Grilled over an open flame, that is, be it gas or charcoal. But if you don't have a grill, or if it's wintertime where you live (as it is here) and you don't feel motivated to fire the thing up, I have cooked the chicken under the broiler in my oven, as well as on one of those indoor electric grills (though not the 'Foreman' type- a review is planned for the future). Both worked sufficiently well, though grilling over open flame is definitely preferred.
While the chicken is cooking, make up some delicious chipotle mayo (if you don't already have some. It keeps for quite awhile in the fridge, so can be made well in advance). Although there really is no specific 'recipe' for chipotle mayo- you basically just chop up the can of chipotles (or run through the food processor/blender) and mix with mayo until it tastes the way you want- the general ratio I use is one can of chipotles (~ 7 oz./200 grams) to 4 cups mayo. You can throw the whole mix in the food processor and mix it all that way, if you like, but I've found that mayo doesn't stand up to a blender very well. It tends to un-emulsify. Lately, I've just been using a knife to chop the peppers by hand, and mix them into the mayo with a wire whip.
Before I go any further, I just want to point out the obvious- not all brands of chipotle in adobo/jalapeño slices are created equal. Not by a long shot. At work, we use Casa Fiesta chipotles, and Pasado (or El Pasado, I can't remember which it is) jalapeños, both of which are excellent, but neither of which I've seen in stores around here. So these are my picks, based on what I've found around my area-
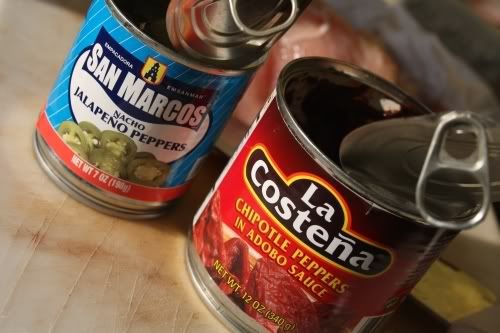
San Marcos jalapeños are excellent, as are La Costeña chipotles. However- and this to me is very weird- San Marcos chipotles are not so good (I'd use them if I couldn't find something else I liked) and La Costeña jalapeños are downright yucky. Totally mushy, no crunch at all. I took one bite and threw the can away. (I would not use them if I couldn't find something else I liked.) Other brands I've tried that suck are Mrs. Renfro's, and Bakers and Chefs (Sam's Club). No offense to either of those brands, I have no doubt they make other quality products, but their jalapeño slices are just plain yucky. If you're not sure, it's best to try different brands until you find something you like. Just buy the smallest size available, one or two brands at a time until you hit the jackpot. I like the San Marcos jalapeños so much that I went out and bought one of those #10 size cans of them (around 4 lbs./1.8 kg, I think).
***
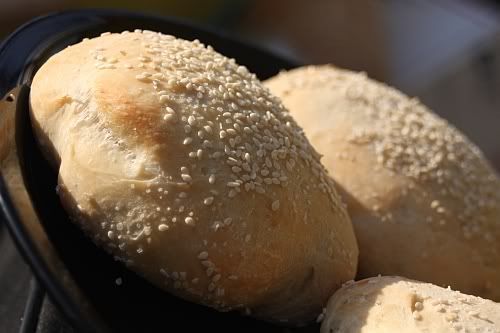
Mmmmm.... homemade hamburger buns!
I'm trying out different recipes for homemade burger buns. This one was pretty good, but I've only tried it once or twice. I want to make it at least one more time, as well as try out some of the others I've found before posting a review about them.
There's really not much else to say here- melt the cheese on the chicken, spread a generous amount of chipotle mayo on the bun (preferably homemade) add the jalapeños, lettuce, tomato, and onion, and prepare for a flavor explosion.
You see that? That's what a chicken sandwich should look like. Or a burger, for that matter. Pretty much any kind of sandwich. In fact, that's what a real sandwich does look like- messy; falling over; sesame seeds falling off; toppings spilling out. Not all perfect and cookie-cutter like the pics in chain restaurant menus and on tv. But whatever, we all know this already. So, let's talk about this sammich, shall we? I'm not sure who came up with it. But it's what we tend to eat at work most days. In fact, I eat it- on average- 4 days a week for lunch, and have been for at least the past year, and I'm not the least bit tired of it. Not even close. It's dead simple, too. So simple, in fact, that it doesn't even sound all that exciting or praise-worthy, or even worthy of a blog post. It almost sounds like an average chicken sandwich, albeit one with a little kick to it.
But it's not.
Ignore it at your peril. It's your loss if you do.
(check out that homemade bun action!)
But if you're interested, read on...
So like I said, I've been eating it an average of 4 days a week for lunch for at least the past year and am not the slightest bit bored with it. It's just so damn good. (Worth firing up the grill in the wintertime for, that's for sure!) And fairly quick and easy to make. All the ingredients are pretty much available anywhere. Homemade-bun-action is not necessary (I don't bother at work, but I've made them at home a couple times- I plan on doing a post on them here at some point). Ingredients are as follows-
Chicken breast
Lettuce, Tomato, Onion (LTO, as we say at work)
Nacho-sliced pickled jalapeños
Chipotle peppers in adobo sauce
Mayonnaise
Hamburger bun (Duh, right? But I've used plain old white bread before- a 'decent' quality, of course- when I didn't have any buns, and I have plans to use hoagie buns next. Mostly because I need to use them before I have to toss them.)
American cheese
And that's it. Now, I know a lot of folks turn their nose up at the lowly American cheese. And I know that it's sort of 'ghetto' in the foodie world. But it really works on this sandwich. It really does. Don't believe me? Go on, then. Try it and see. You'll be surprised. (C'mon, one time won't hurt. You know you want to.) Oh, and full disclosure here, the cheese used on the sandwich in these particular photos was Muenster. Muenster is one of my favorites (you should totally try it on pizza instead of Mozzarella!) but in the case of this sandwich, I actually prefer the American, I must say. I just used Muenster because I had it, and didn't have any American. Muenster rocks the grilled cheese sandwich, but for this sandwich, trust me- use American. Ok, let's put it all together...
First things first, though. You should really marinate the chicken in some sort of marinade, or at least brine it to help keep it tender and juicy. As far as a marinade goes, I really like this one, even though it was originally meant for steak. I tried it once with steak and didn't think it lived up to its name, but then again, I'm not much of a red meat eater anymore. Most of the meat I eat nowadays is chicken, so I tried it on that and liked it very much. But if you don't want to bother with making that up, then a simple brine of sugar/salt water does wonders. I usually dissolve 4-6 T each of sugar and salt (kosher, of course) per gallon of water and allow the chicken to soak in that for about an hour. Now when it comes to cooking, the chicken is really best grilled. Grilled over an open flame, that is, be it gas or charcoal. But if you don't have a grill, or if it's wintertime where you live (as it is here) and you don't feel motivated to fire the thing up, I have cooked the chicken under the broiler in my oven, as well as on one of those indoor electric grills (though not the 'Foreman' type- a review is planned for the future). Both worked sufficiently well, though grilling over open flame is definitely preferred.
While the chicken is cooking, make up some delicious chipotle mayo (if you don't already have some. It keeps for quite awhile in the fridge, so can be made well in advance). Although there really is no specific 'recipe' for chipotle mayo- you basically just chop up the can of chipotles (or run through the food processor/blender) and mix with mayo until it tastes the way you want- the general ratio I use is one can of chipotles (~ 7 oz./200 grams) to 4 cups mayo. You can throw the whole mix in the food processor and mix it all that way, if you like, but I've found that mayo doesn't stand up to a blender very well. It tends to un-emulsify. Lately, I've just been using a knife to chop the peppers by hand, and mix them into the mayo with a wire whip.
Before I go any further, I just want to point out the obvious- not all brands of chipotle in adobo/jalapeño slices are created equal. Not by a long shot. At work, we use Casa Fiesta chipotles, and Pasado (or El Pasado, I can't remember which it is) jalapeños, both of which are excellent, but neither of which I've seen in stores around here. So these are my picks, based on what I've found around my area-
San Marcos jalapeños are excellent, as are La Costeña chipotles. However- and this to me is very weird- San Marcos chipotles are not so good (I'd use them if I couldn't find something else I liked) and La Costeña jalapeños are downright yucky. Totally mushy, no crunch at all. I took one bite and threw the can away. (I would not use them if I couldn't find something else I liked.) Other brands I've tried that suck are Mrs. Renfro's, and Bakers and Chefs (Sam's Club). No offense to either of those brands, I have no doubt they make other quality products, but their jalapeño slices are just plain yucky. If you're not sure, it's best to try different brands until you find something you like. Just buy the smallest size available, one or two brands at a time until you hit the jackpot. I like the San Marcos jalapeños so much that I went out and bought one of those #10 size cans of them (around 4 lbs./1.8 kg, I think).
***
Mmmmm.... homemade hamburger buns!
I'm trying out different recipes for homemade burger buns. This one was pretty good, but I've only tried it once or twice. I want to make it at least one more time, as well as try out some of the others I've found before posting a review about them.
There's really not much else to say here- melt the cheese on the chicken, spread a generous amount of chipotle mayo on the bun (preferably homemade) add the jalapeños, lettuce, tomato, and onion, and prepare for a flavor explosion.
Thursday, February 11, 2010
Today at Sweeney's...
So I made this Curry Chicken Stew today at work as part of the special. It turned out to be quite popular- we sold a boatload of it. The specials just flew right out the door. One guy even asked for the recipe (which I don't have, since I kind of just threw it all together as I went)! So I wrote down the ingredients and basic routine for putting it all together, and because it was so popular I plan on doing a post about it here, hopefully sooner rather than later, but for now this post is for that dude who asked for the recipe, on the off-chance that he may have stopped by (since I added the web address to the list of ingredients).
I left off one very important part- when you take the chicken out of the oven, save the cooking liquid and add it to the pot. It adds a very nice, and essential, chicken flavor to the stew, as well as saves you the step of either making your own chicken stock, or using a store-bought one. Also, it keeps the sodium level down (because even low-sodium chicken stock isn't really all that low-sodium). It really does make a difference. I found this out because I made approximately 3 gallons of soup (not un-typical for me) and so when it came time to replenish the soup-well, the second half was a little low on liquid, so I had to add more of everything to kind of even it out; except the only thing I didn't have was more of the liquid that the chicken was cooked in. And when I compared it to the first half, the difference was quite noticeable (to me, anyway). So, you don't want to skip that step.
And to any vegetarians who may have happened by here and want to try this out when the actual more-detailed post goes up- obviously, it can easily be made vegetarian (and still be great!) - just substitute with your favorite store-bought veggie stock or (I recommend) make your own- preferably with only veggies that are in the stew, or complement the ones that are (onions, garlic, celery, roasted red peppers, yellow bell peppers).
And... maybe, possibly (but not likely, in all honesty) I'll have this soup recipe-thingy posted around next week sometime : )
Monday, February 8, 2010
Leftover D-lite, II (also vegetarian, even)
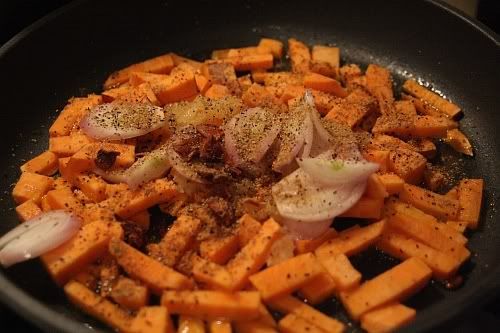
So I opened the bottom drawer in my fridge (actually, it's my brother's fridge, but it's 'my' drawer) and noticed that I had half of a sweet potato that I needed to use up. Also had a shallot in there. Was thinking that maybe I'd sauté them up together in some olive oil and a little salt and pepper and try that on for size. Once I got started, I decided to throw on a little ground coriander, since it was sitting on the counter from being used earlier in the day. Why not, right? Also out was my little jar of star anise (mostly pieces, at this point). Again, why not? Had some minced garlic in the freezer too, calling out to me. In it went. As it was cooking, I headed down to the basement to see what I had hiding. What I ended up bringing up was some cooking sherry and double strength vanilla extract. In they went (couple splashes of the sherry, 1/2 t of the vanilla). And y'know what? It was pretty darn good-
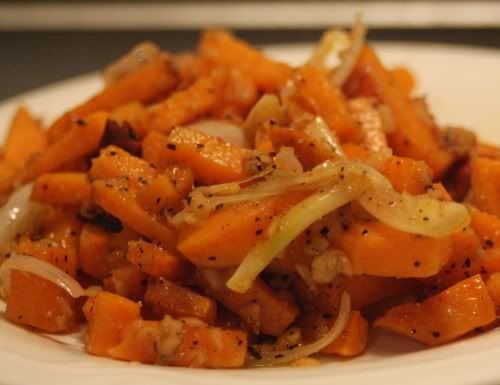
If I'd had some cloves, I probably would've added one of those, or two. Thought about adding some balsamic vinegar, but went with the sherry instead. Some onions would've been nice, but for some reason I held off. I considered slicing up a banana and tossing that in. Maybe a carrot? Some fresh squeezed lemon juice? Had some red bell peppers that I got cheap today (a buck each, approximately). Those didn't make it, though. I have other plans for those, which I'm going to write about here at some point (you'll want to read that post, I can assure you). Lots of stuff could have gone into this dish, and probably would've been very good too. The point is, why leave a perfectly good sweet potato sitting in the bottom drawer of your fridge, waiting until it goes bad and has to get tossed? Why just bake it like everyone else and eat it with butter and brown sugar (like everyone else)? Play with your food. Experiment. You don't need a recipe- this is how recipes get created! Specific amounts? Who cares? Just go with less than you think you need, and add more as you find you need it.
This is how I cook.
This is what I eat.
Not every single day, not all the time. But I've been really, really turned off lately by a lot of the store-bought processed junk I used to go with, and see everyone else eating all the time. I prefer fresh, simple, homemade stuff. Not exactly the guilty pleasure that eating a whole bag of pizza bites with Frank's Red Hot used to be, but hey, I'm losing weight and feeling better about myself, so it's all good.
Tuesday, January 19, 2010
Monday, January 11, 2010
Nut Goody Bars
Dangerous. That's what these things are. Absolutely dangerous. For your hips, your waistline, your thighs... wherever. No place is safe when you take a bite of these. Heck, if your teeth don't rot and fall out of your head, they'll probably gain weight. But it'll be worth it- these things are rich and decadent and calling your name this very minute...
You want to make these.
You need to make these.

(photo credit: Kathie Jenkins/Pioneer Press)
And before I go any further, I'd like to say a couple things- first, the recipe comes from my local newspaper. I had to sign up for their Cookie-A-Day email newsletter to get it (though I probably could have found it in the archives later, but I didn't know that at the time and didn't want to take any chances on missing it). So they get the credit. I never would have come up with this on my own. However, having made it, and compared it to an actual Nut Goodie Bar, I have a couple slight tweaks to recommend, as well as a couple thoughts on the making process. But for now, the recipe, courtesy Kathie Jenkins, Pioneer Press Food Editor:
To prepare bars: Melt milk chocolate and unsweetened chocolate. Spread small amount of melted chocolate to cover bottom of jellyroll pan. Put pan in freezer.
To prepare filling: In small saucepan, combine butter, pudding mix and milk. Bring to a boil. (Note: Don't worry if mixture curdles, just keep stirring.) Remove from heat. Set aside to cool slightly. Pour mixture into large bowl. Using electric mixer on low speed, beat in maple flavoring. Slowly add powdered sugar. Continue to beat until combined and no lumps remain. Spread mixture over chocolate layer in jellyroll pan. Refrigerate until firm.
To finish bars: Stir salted peanuts into remaining chocolate mixture. Mix well. Spread evenly over powdered-sugar layer.
To cool bars: Refrigerate until firm. Remove from refrigerator. Cover with rack or cookie sheet. Invert. Remove pan and foil lining. Cover with cutting board or length of wax paper. Invert again, leaving bars right side up. Cut into 1-by-3-inch bars or, if using on cookie tray, cut smaller.
*****
Ok, some thoughts...
The recipe calls for Virginia peanuts, but I don't see why dry-roasted nuts wouldn't work (although, it does stray from the actual product, which in fact uses unsalted Virginia peanuts. Then again, they also use corn syrup, soy protein (wtf?) and invertase (whatever that is) which aren't in this recipe, so do whatever you like). In fact, I think they might actually be better, since they (I believe) are a little saltier. Because the recipe could use a little salt. I actually bought a Nut Goodie Bar from the store to compare the two, and these tasted very, very similar to the commercial variety (nice work, Kathie!). The main difference I noticed was that the commercial one was a little saltier (just enough, though). But before I even tasted the store-bought one, I knew from tasting the pudding/powdered sugar mix as I was blending it that it definitely needed some, and so threw in a couple pinches of kosher salt. Even that was not enough, in my opinion, once I tasted the finished product. So... couple pinches of kosher along with dry roasted nuts, or Virginia nuts with maybe a teaspoon (totally estimating here...) of kosher.
I also think it needs more maple flavoring than what the recipe calls for. I didn't measure it out, preferring instead to eyeball it, as is my habit when it comes to adding stuff to recipes, but I think I added approximately double what the recipe calls for. That's about what I was aiming for, anyway. Taste it as you make it to see what you think, but I think mine came out great with (approximately) double.
You'll notice that the recipe says, 'Don't worry if mixture curdles, just keep stirring.' Yeah, that's an understatement. She makes it sound like it might not curdle. Well, it curdled alright, and quite a bit. I was briefly tempted to throw the mix out and start over, thinking that I must have done something wrong, but I took her advice and just kept stirring, and it came out just fine. So keep that in mind when you're mixing the sugar/pudding mix. No matter how it looks, just keep stirring. Also, she says, 'Using electric mixer on low speed, beat in maple flavoring. Slowly add powdered sugar.' She makes it sound like you want to keep the mixer on low the whole time (and kind of you do- you don't want powdered sugar flying everywhere) but you'll see as soon as you start doing this that you'll need to turn the speed up at some point, and quite high depending on your mixer's power. There's a lot of sugar involved, and the mix gets quite thick. Low speed probably will not cut it for very long.
I don't have any pics of the actual cooking process, but I do have some pics of the results:
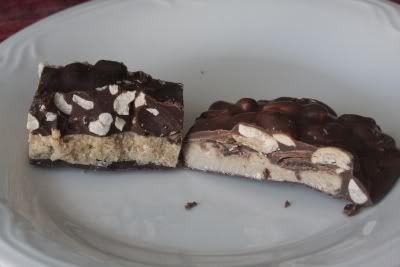
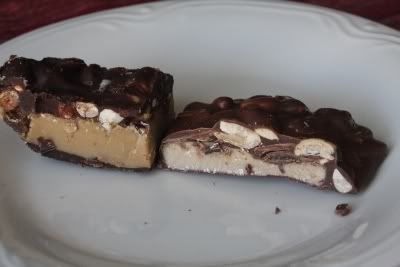
The ones on the left are mine, and the ones on the right are the store-bought. As you can see, both the top layer of chocolate and the middle nougat layer are quite thick in mine. A little too thick. But I was using some weird cake pan, unlike any other cake pan I've ever used before, with really thick high walls, so it was difficult to tell when I was spreading it all out just how thick I was laying it on. No biggie, though, they still taste phenomenal. I think maybe more nuts would be in order, though. Nuts and chocolate go together like, well, nuts and chocolate, and more is always better. At least until you reach some sort of equilibrium, say 50-50. (Mine is more 60-40, chocolate to nuts.)
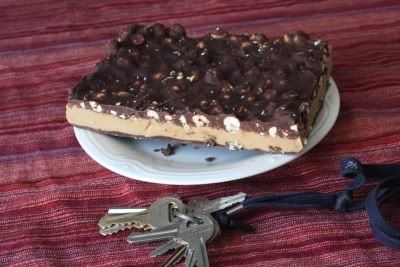
Here's another shot, with some keys thrown in for perspective (hey, it's all I had handy at the moment) -
Ok, now get thee to a kitchen without delay- these things are still calling out to you and they don't like to be kept waiting!
(p.s. i know the title of the post is spelled slightly different than the actual product. not a mistake.)
You want to make these.
You need to make these.
(photo credit: Kathie Jenkins/Pioneer Press)
And before I go any further, I'd like to say a couple things- first, the recipe comes from my local newspaper. I had to sign up for their Cookie-A-Day email newsletter to get it (though I probably could have found it in the archives later, but I didn't know that at the time and didn't want to take any chances on missing it). So they get the credit. I never would have come up with this on my own. However, having made it, and compared it to an actual Nut Goodie Bar, I have a couple slight tweaks to recommend, as well as a couple thoughts on the making process. But for now, the recipe, courtesy Kathie Jenkins, Pioneer Press Food Editor:
Makes 2 dozen (1-by-3-inch) bars.
- 1-1/2 pounds milk chocolate
- 1 square (1 ounce) unsweetened chocolate
- 1 cup butter
- 1 box (3.4 ounces) regular vanilla pudding mix
- 1/2 cup evaporated milk
- 1-1/4 teaspoons maple flavoring
- 2 pounds powdered sugar
- 1 pound Virginia peanuts
To prepare pan: Invert 10-by-15-inch jellyroll pan. Place length of aluminum foil, shiny side down, over pan. Using hands, press down on sides and corners of foil to shape it to pan. Remove foil. Turn pan right side up. Place foil in pan. Very carefully press foil in place in pan. Lightly butter foil. Set aside.
To prepare bars: Melt milk chocolate and unsweetened chocolate. Spread small amount of melted chocolate to cover bottom of jellyroll pan. Put pan in freezer.
To prepare filling: In small saucepan, combine butter, pudding mix and milk. Bring to a boil. (Note: Don't worry if mixture curdles, just keep stirring.) Remove from heat. Set aside to cool slightly. Pour mixture into large bowl. Using electric mixer on low speed, beat in maple flavoring. Slowly add powdered sugar. Continue to beat until combined and no lumps remain. Spread mixture over chocolate layer in jellyroll pan. Refrigerate until firm.
To finish bars: Stir salted peanuts into remaining chocolate mixture. Mix well. Spread evenly over powdered-sugar layer.
To cool bars: Refrigerate until firm. Remove from refrigerator. Cover with rack or cookie sheet. Invert. Remove pan and foil lining. Cover with cutting board or length of wax paper. Invert again, leaving bars right side up. Cut into 1-by-3-inch bars or, if using on cookie tray, cut smaller.
*****
Ok, some thoughts...
The recipe calls for Virginia peanuts, but I don't see why dry-roasted nuts wouldn't work (although, it does stray from the actual product, which in fact uses unsalted Virginia peanuts. Then again, they also use corn syrup, soy protein (wtf?) and invertase (whatever that is) which aren't in this recipe, so do whatever you like). In fact, I think they might actually be better, since they (I believe) are a little saltier. Because the recipe could use a little salt. I actually bought a Nut Goodie Bar from the store to compare the two, and these tasted very, very similar to the commercial variety (nice work, Kathie!). The main difference I noticed was that the commercial one was a little saltier (just enough, though). But before I even tasted the store-bought one, I knew from tasting the pudding/powdered sugar mix as I was blending it that it definitely needed some, and so threw in a couple pinches of kosher salt. Even that was not enough, in my opinion, once I tasted the finished product. So... couple pinches of kosher along with dry roasted nuts, or Virginia nuts with maybe a teaspoon (totally estimating here...) of kosher.
I also think it needs more maple flavoring than what the recipe calls for. I didn't measure it out, preferring instead to eyeball it, as is my habit when it comes to adding stuff to recipes, but I think I added approximately double what the recipe calls for. That's about what I was aiming for, anyway. Taste it as you make it to see what you think, but I think mine came out great with (approximately) double.
You'll notice that the recipe says, 'Don't worry if mixture curdles, just keep stirring.' Yeah, that's an understatement. She makes it sound like it might not curdle. Well, it curdled alright, and quite a bit. I was briefly tempted to throw the mix out and start over, thinking that I must have done something wrong, but I took her advice and just kept stirring, and it came out just fine. So keep that in mind when you're mixing the sugar/pudding mix. No matter how it looks, just keep stirring. Also, she says, 'Using electric mixer on low speed, beat in maple flavoring. Slowly add powdered sugar.' She makes it sound like you want to keep the mixer on low the whole time (and kind of you do- you don't want powdered sugar flying everywhere) but you'll see as soon as you start doing this that you'll need to turn the speed up at some point, and quite high depending on your mixer's power. There's a lot of sugar involved, and the mix gets quite thick. Low speed probably will not cut it for very long.
I don't have any pics of the actual cooking process, but I do have some pics of the results:
The ones on the left are mine, and the ones on the right are the store-bought. As you can see, both the top layer of chocolate and the middle nougat layer are quite thick in mine. A little too thick. But I was using some weird cake pan, unlike any other cake pan I've ever used before, with really thick high walls, so it was difficult to tell when I was spreading it all out just how thick I was laying it on. No biggie, though, they still taste phenomenal. I think maybe more nuts would be in order, though. Nuts and chocolate go together like, well, nuts and chocolate, and more is always better. At least until you reach some sort of equilibrium, say 50-50. (Mine is more 60-40, chocolate to nuts.)
Here's another shot, with some keys thrown in for perspective (hey, it's all I had handy at the moment) -
Ok, now get thee to a kitchen without delay- these things are still calling out to you and they don't like to be kept waiting!
(p.s. i know the title of the post is spelled slightly different than the actual product. not a mistake.)
Friday, December 11, 2009
Shifting gears
I think it's about time I change things up around here-
I haven't been posting much lately- in fact, I think I went almost a year between posts at one point before coming up with a few new things. But I want to start posting a lot more stuff soon. Problem is, I don't often come up with new 'recipes' or items that are 1. my own, and 2. interesting enough to share. But I've noticed a gradual change in my eating habits over the last six months or so. I'm getting further and further away from store-bought, pre-packaged stuff and more and more into making as much stuff from scratch as is practical. Things like tortillas (both corn and flour) hot sauces, soymilk (and other non-dairy 'milks') bread, yogurt, mayonnaise... pretty much anything that isn't too complicated or expensive to make myself. I even checked out grain mills to see about making my own flour, but decided that that's not really feasible for me at this time (due to a variety of factors, cost being the among least of them). So probably starting sometime in January (December being the busiest month of the year for me) I plan to start posting about the stuff I've made from scratch. Nothing fancy, nothing schmancy, just the simple stuff I make on a regular basis for myself and anyone who happens to be near me and hungry. Not that I'll be posting a lot of stuff or anything- once, maybe twice a month on average- but if I've made something from scratch and liked it (as I did recently with flour tortillas) I'll write something up about it and post the recipe and any changes I might have made, as well as where I found the recipe (if it wasn't something I came up with on my own). I think it's going to be fun. I'm looking forward to it. Homemade is always better (and healthier and cheaper?) than store-bought, and it also doesn't always have to be time-consuming (Artisan bread in 5 minutes a day, anyone?) In fact, I'm somewhat of a lazy cook, anyway. It's not that I just want to get in and out of the kitchen in 10 minutes; I have no problem spending hours prepping and cooking, but I want to strike a balance between time and simplicity. I don't like making complicated stuff. I think the most complicated thing I've made were those tacos I blogged about awhile back, and those are actually quite simple- it only looks complicated when you read about it; actually making them is no big deal. So anyway, here's to making much more stuff from scratch in 2010. Also, I'm always eager to hear about anyone else's experiences, so if you make your own- whatever (doesn't even have to be food, really- I'm going to try making my own version of Burt's Bees Hand Salve pretty soon) please, leave a comment and/or a link to a recipe- I'd love to hear about it!
Cheers.
Subscribe to:
Posts (Atom)