Tuesday, December 25, 2012

You'll Want To Put These Balls In Your Mouth Two At A Time!

(Title credit: Amy)


Alternate titles:

'My Second Favorite Set Of Balls'

'Now Here's Some Balls You'll Really Love Eating'


It's pretty tough coming up with a decent title for a blog post about cheese balls. You can't just say 'World's Best Cheese Balls,' or even, 'Totally Amazing, Must-Try, Most-Deliciousest-Ever Cheeeese Baaalllsss!!1!' Nobody's going to want to read about that, even though in this case it's probably accurate.
Anyway, the lowly cheese ball- it's just a ball of cheese, usually covered in almonds, that you spread on crackers. How good can it be, right? Well, if you're my friend Heather, who was married to a chef for ten years, then it can be really, really good. We were at a party at a mutual friend's house one night a few weeks back, sitting out on the patio, and she was telling us about this cheese ball that she'd made. Said she'd used Laughing Cow, goat cheese, and that one with garlic and herbs, she couldn't remember the name. (It was Boursin.) Ok, that alone was sounding pretty good, but then she mentioned that she put dried blueberries in it. I must have made a face because then she said, 'Yeah, I know, it sounds weird, right?' I said, 'Hell no, it sounds awesome! You got anymore?' Turns out it was her contribution to the party's food supply and it was sitting right there in the kitchen for the taking! So me and a friend rushed in to get some. I took one bite and right then I knew- I knew - that even if I hadn't been drunk it still would have tasted just as awesome. And it does. The mildness of the Laughing Cow balances out the weirdness of the goat cheese, and the sweetness of the blueberries balance out the savoriness of the Boursin. Sesame seed crackers make for a really nice diversion from the usual Ritz or whatever, and the almonds add more visual appeal as well as extra crunch.

Like I often do when I make stuff, Heather didn't really use a recipe, but she remembered enough about it that I was able to pretty much recreate it. Here's what you'll need:


12 wedges Laughing Cow cheese (regular, not that light crap)

1 package Regular (garlic & herb) Boursin

1/2 lb. goat cheese

~1/3 c mayo 

~1/2 c (packed) dried blueberries

Toasted almonds

Sesame seed crackers


Putting it all together is about as straightforward as it seems. The worst part is unwrapping all those Laughing Cow triangles- kind of a pain in the ass, really, but it's worth it. You'll want the cheese to soften up a little to make it easier to blend, but in my experience, the LC triangles are easier to pop out of the wrapper if they're nice and firm, so I usually just unwrap all the cheese and toss it in a bowl while it's plenty cold, and then leave it out for a little while (or microwave it on low power) to soften up. Then add the mayo, then the blueberries, then mix thoroughly. Put back in the fridge for awhile to firm up so you can form balls with it, then roll in chopped, toasted almonds. The sliced almonds you get in the baking aisle of the grocery store are ok too, but they tend not to have a whole lot of flavor. I wouldn't waste my money on them.

Serve with sesame crackers at your next party, and watch while folks gobble these balls up like porn stars gobble up the other kind!


(I mentioned in my last post about an upcoming special announcement, thinking it'd be up by now, but the holidays, among other things, have caused delays. So, next month sometime for sure. It's really cool, too. Can't. Wait!)


Sunday, November 25, 2012

Bodie's Most Bad-Ass Red Beans & Rice

Usually I hate it when I lose something I was working on (like a recipe) and have to start over from scratch, but in this case it worked out pretty well. What happened is that a couple months ago or so, I came up with what I thought was the best rice and beans I had ever eaten. Actually, it was the best rice and beans I'd eaten- at that time. (There was one time before that, but I never bothered to write anything down, so all I had was an awesome dish with no accurate way to re-create it.) And this time, luckily, I actually managed to write everything down as I made it so I'd be able to re-create it any time. But unluckily, I stored the main copy of the recipe in my Gmail account, thinking it'd be about as safe there as anywhere. And actually it was pretty safe there, so I erased the copy I had on my dry-erase board in the kitchen. But in an effort to clean up my Gmail, I completely deleted a whole bunch of emails, accidentally including the red beans and rice recipe, among a couple other kind of important recipes. (Even though it's unlikely to ever happen again, I'm now using Backupify again. I used to use it a long time ago when it first came out- thankfully, because that means it's still free for me- but didn't really see the need for it, so I stopped.) So there went my most-bad-ass-ever recipe for red beans and rice. But I figured since I'd done it once or twice before, I might be able to do it again.  And not only did I do it again, but I think this one is even better! So yee-haw for happy accidents (though I'm still sticking with Backupify).


What you'll need:

3 c dry pintos or red beans
7 c water

1lb bacon (minus what you eat after smoking it, because it's so damn good) + drippings
2 smoked pork hocks/pig's ears/whatevers
A couple jalapeños and cayennes (if you like yours a little spicier)
2 each guajillos and pasillas de Oaxaca*

3 T chopped chipotles in adobo (I highly recommend La Costeña brand)
3 T chili powder
3 T toasted cumin
3 T granulated garlic
2 T paprika
2 T mild jalapeño-lime blend**
2 T cider vinegar
2 T dried epazote
2 T dried cilantro
1 T onion powder
1 T oregano
1 1/2 t sugar
1 1/2 t coarse sea salt
1 t thyme
pinch of dill
several grinds of black pepper 

1 can of no-salt-added diced tomatoes
1/2 can of tomato paste
1 can of beer
6 T Louisiana hot sauce
2 T Valentina hot sauce
1 ea. red bell pepper and yellow onion, diced
fresh cilantro and/or green onions (and more Valentina) for garnish


Take your raw bacon (high quality or cheap-ass store brand, it really doesn't make much difference in this case) your smoked pork/turkey/whatever parts, and smoke them again. Really, fire up the grill, load on the wood chips and smoke the hell out of those suckers! Make sure you have some sort of drip pan underneath to catch all of the drippings. If you have a big enough grill and can fit it all on, I'd also recommend smoking your chile powders, cumin, salt, pepper, etc. I don't have a big enough grill to do it all at once though, and by the time the bacon and pork is smoked to the point where I want it to be, the wood chips are spent and I don't feel like doing it all again.
It's almost impossible to oversmoke the smoked pork parts, but I suppose you could, in theory, overdo the bacon since this involves hot-smoking and letting it go too long will result in burnt bacon. I let mine go until it's dark brown and crispy. I've burned the smoked hocks before, but it was only superficial and after cooking down in the beans awhile they were as tasty as ever. Bacon being so thin, however, that wouldn't work.

Next come the beans. I have a pressure cooker (Presto, 8 qt.) so that's how this recipe was written. If you don't have one, then cook the beans however you normally would, soaking them overnight or whatever. But with the pressure cooker, I never bother with that. Take the unsoaked beans, add the water, smoked meats, guajillos and pasillas (and the other chiles, if you're using them) and add it all to the pot. Bring it up to high pressure, then turn down to low pressure and set a timer for 21 minutes. When the time's up, release pressure using the cool water method and return to the stove over med-low heat. (When you open the pot, it'll probably look like there's not nearly enough liquid, but once the beer, hot sauce and tomatoes come into play, it'll be perfect.) In a separate pan, sauté the pepper and onions until they're brown and crispy, and deglaze with some of the beer. Scrape it all into the beans, pour in the rest of the beer and wet ingredients and add all your dry seasonings. At this point you just let it simmer away happily on low to med-low for awhile, either until the beans are completely softened up (if they weren't already after the initial pressure cook) or for at least a good 20-30 minutes. While that's going, get your rice cooking and have a few more beers. Speaking of which, every time I've made this, I've used el-cheapo Genesee Ice ($2.99/6-pack!) and it's always come out amazing. I can only imagine how much better it would be if I used a better beer. Then again, if you have to pay for beer, is there a better one than the one that costs $3 for a 6-pack? I'm not sure.


* Pasillas de Oaxaca... not the same as regular pasillas (pasilla negro). Pasillas de Oaxaca, as the name suggests, are from Oaxaca. I don't know much more about the differences between them other than the Oaxacan version is very smoky tasting (which is why I like them) and much harder to find, therefore more expensive than the regular. Like 3x more expensive. Last I checked, they go for around $30/lb. They're so good though. Definitely worth trying out.

** Mild jalapeño-lime blend. It's a custom spice blend I make, most often to put on tortilla chips, but it goes well in stuff like this too. Not available for sale anywhere yet, but it will be soon, so stay tuned for that announcement. But if you don't want to buy it, I'd just sub some canned green chiles and fresh lime juice.


Tuesday, November 13, 2012

Kitchen Confidential

So I just recently finished reading Anthony Bourdain's 'Kitchen Confidential' for the first time.  I couldn't believe that it had been first published 12 years ago and I'd never read it before. I actually didn't really know that much about him, other than that he was a 'celebrity' chef and all that b.s. But if you haven't read the book, I highly recommend it, especially if you want some insight into the restaurant biz. I found it to be not only highly entertaining, but also there was very, very little that I've found not to be 100% accurate, based on my own experience. (Case in point: he says that despite all the foul language to be heard, joking around about 'your mom, girlfriend/boyfriend, etc.,' is off limits. In my own experience, 'your mom/girlfriend' jokes are abundant, and par for the course. Maybe things have changed since he was in the biz, I don't know.) In any case, as I've already said, if you haven't read it, I highly recommend it; in fact, I can't recommend it enough. Very accurate, very entertaining.

On a side note, I've got a totally badass red-bean-and-rice recipe coming up, as well as a special announcement (special to me, anyway). Stay tuned; one (maybe both) should be up within the week...


Monday, September 17, 2012

'All Your Honey Are Belong To Us!' - China

Came across a really interesting article on honey the other day over at Foodista. They referenced an article by Food Safety News showing that most honey sold here in the U.S. has had all of it's pollen filtered out, making it impossible to trace the origin, which likely means it's ultimately from China. And since the Chinese generally have no problems selling us highly adulterated shit, some people might find that problematic. Worth looking into more if you use honey at all and would prefer to know that what you're using actually is real honey.


More info:

Here's a link to the shorter version on Foodista.

Here's a similar article on Huffington Post.

A longer (3 page) article published last year by abc news- Tainted Honey Sparks Push for FDA Standard.

And here's the Food Safety News article (a bit long, but worth reading) - Tests Show Most Store Honey Isn't Honey.

Wednesday, September 5, 2012

My People Call It Maize

Years ago, when I was living in Chicago, I'd see these Mexican food carts, with the vendors selling some sort of corn on a stick. A friend of mine told me they slathered it with mayo, cayenne, parmesan cheese, and maybe some cilantro and lime juice. My first thought was, man that sounds gross. Mayonnaise on corn? The whole thing just seemed weird to me. Fast forward to about a week ago, when I noticed a recipe Saveur posted for Mexican-Style Roasted Corn. I have to admit, the picture kind of sold me on it, so I went out and bought some corn and Queso Fresco. I know their recipe calls for Cotija, but when I got to the store, I couldn't remember for sure if that was it. I thought it was, but the only Cotija I saw looked like overpriced Parm, so I went with Queso Fresco instead. I think I made the right choice.

I made some other, minor, tweaks as well. You can follow their recipe to the letter if you want, but this stuff is dead simple. No recipe needed. They peeled the husks back and tied them with twine; while it does look kinda pretty, it's probably not really necessary. Strip those babies off and throw them in your jerk neighbor's yard or driveway. Saveur soaked their corn in water for a half hour. I didn't soak mine at all, and it came out fine.

Here's a list of my ingredients:

Corn, husks removed
Mayo
Queso Fresco
Chili Powder
Jalapeño-Lime powder (my own blend; not really for sale anywhere- yet!)
Cayenne
Fresh lime juice
Fresh cilantro


Putting it all together is almost self-explanatory, but here's how anyway:

Grill the corn till it's as done as you'd like. Slather on the mayo in whatever quantity you'd like. Roll the corn around in a dish of crumbled Queso Fresco till it's nice and coated, then sprinkle with your choice of chili powder(s). Salt and pepper if you want, then squeeze some fresh lime juice on it and hit it with some cilantro. Then, while guzzling a beer, give your neighbors some shit about their stupid messy lawn/driveway.

Saturday, August 4, 2012

Muhammara, aka 'Uh, what?' (Updated, with photos)

Muhummad-who? Uh, Muhammara. It's a Middle Eastern pepper dip, or spread, very similar to hummus in consistency, but with some different ingredients and a deep maroon color. Yeah, if you've never heard of it before, don't worry, you're not alone. I've worked with countless cooks and foodie-types over the years, and the only ones I know who know what Muhammara is are the ones I've told about it. And I think that's a damn shame, because it's really tasty and really easy to make. Slightly sweet, tart, spicy and savory all at once, it goes good on flatbread, but is really great as a dip for veggies.

I first read about it on The Perfect Pantry about four years ago, while looking for recipes that called for Aleppo pepper. This was the recipe I came across and it sounded pretty good so I tried it out at work one day. Never having had it before, I didn't really know if it was any good compared to other Muhammara recipes or not. It was decent overall, but it seemed to me like it was lacking something. I had a couple other people try it out and they thought the same thing. So I started looking for other recipes for it, and quickly found out that yes, it was in fact missing something, at least according to most of the other recipes I found- roasted red peppers! I'm not sure which version is the most 'traditional,' but the vast majority of recipes I've come across call for them, so I'd say it's probably a key ingredient, kind of like tahini in hummus. I've tried it both ways and definitely prefer the kind with the roasted reds. The Perfect Pantry has another recipe for it that does include roasted red peppers, but calls for cashews instead of walnuts. I haven't tried that one yet, mostly because I came up with my own version that I think is pretty damn good, so when I make it I always end up using my own recipe. And like hummus, the exact recipe isn't strictly necessary; if you have a basic idea of what's in it and how you want it to taste, you'll be good to go. But here it is anyway:

Muhammara

2 1/2 lbs roasted red bell peppers (fresh, of course)
1 1/2 c toasted, chopped walnuts
1 c bread crumbs
1/4 c light olive oil
6 T cumin, toasted
3 T tomato paste
2 T chopped garlic
2 T pomegranate molasses*
1T lemon juice
1t Aleppo pepper
1/2-1 t kosher/sea salt


Let's start with the roasted reds-

Photobucket

I've found that roasting them over an open flame is best, and easiest. I've tried roasting them under the broiler in the oven, or even just baking them under really high heat, but I've not had much luck with that method. Then again, I don't have a Silpat, which might improve matters. But even if I did have a Silpat, I think I'd still prefer open flame. If you don't have access to a grill (either gas or charcoal, it doesn't really matter), you might try a propane torch. I've used one successfully, but it took a little more finesse than a grill. But still, better (in my opinion) than doing it in the oven. If you've never roasted peppers before, you want them looking kinda sorta like the ones in the photo above. I usually char mine quite a bit more than what you see there, though it's not totally necessary. However, you do need to keep an eye on those bad boys while you're roasting them; make sure the heat isn't too high and to turn them at least every once in awhile. I figured it would be very difficult to over-roast them, but it turns out that's not the case at all, and I had to throw out most of the peppers for this latest batch and go and buy some more. If you know me at all, you won't be surprised to learn that there was alcohol involved. In any case, once they're at the desired char level, toss them into a stainless steel mixing bowl and cover with plastic wrap to trap the heat and steam them for a bit. Once they're cool enough to handle, you can easily peel the charred skin off from the flesh, discarding it along with the seeds and stems.

It's pretty straightforward and simple from here- everything's going to go into the food processor. No need to slowly drizzle in the oil like you're making mayonnaise or something, but you might want to roughly chop the peppers a bit first so they'll blend a little quicker. Adjust the amount of salt/pepper/lemon to taste. Maybe throw in or garnish with some sumac.

Penzey's, among other places, has Aleppo pepper, but if you don't want to bother with it, plain old crushed red pepper flakes make a good substitute. Once it's all blitzed up in ye olde Cuisinart, it should look something like this:

Photobucket


You can see seeds and bits of charred skin in there- no biggie, you ain't gonna get rid of all that stuff anyway, so I figure if it affects the flavor at all, it's only for the better.


So that's my Muhammara recipe. Which has so far been a pretty good hit with everyone who's tried it.


Give it a shot, and I'd love to hear how it compares with others you've tried.


* If you can't find pomegranate molasses, substitute with 1/4 c of pomegranate juice concentrate, which should be available in the frozen juice section of just about every grocery store everywhere.


Saturday, June 16, 2012

Hello Bánh Mì, We Meet Again...

About a year and a half ago, I created one of the two best sandwiches I've ever had in my life, the Bánh mì. Well, I didn't create the original Bánh mì, but I think I probably improved on it with my version. I've had Bánh mì from four other places so far, three of them Vietnamese, and so far mine has been better than any of them. Not just slightly better, either, I mean a whole lot better. Which thrills and saddens me at the same time. Anyway, I've always wanted to experiment and come up with a different kind, something a little more 'traditional,' using pork instead of chicken. But every time I got the urge to make Bánh mì, I went with the tried-and-true and made my old version. Well, earlier this year, I and a foodie friend of mine teamed up and decided that the time for talk was over, we were going to put our heads together and come up with a new version, something at least as good as the old one, something that really rocked. And we did it. On the very first try, even. No tweaking the final recipe necessary.

This new Bánh mì is definitely more work to make. Not so much that it's not worth making, but there's definitely a lot more ingredients and a lot more steps involved. The payoff, however, is so worth it.

I do get a little specific when it comes to seasonings in the ingredients list- for example, this recipe specifically calls for Kwong Hung Seng brand thin soy sauce- but that's for consistency's sake. I don't normally get too hung up on using specific brands in my cooking- one good quality fish sauce is about as good as another- but when we were in the kitchen making this, my friend had a different brand of thin soy sauce, and we tasted both. The Kwong Hung Seng brand was much, much stronger. And because we both, along with everyone else who's tried it so far, think this is a pretty special recipe, I want to make sure that anyone else who wants to make it can make it as close to our original dish as possible.

Here's (almost) everything we used:

Sandwich:

Crusty baguettes (preferably homemade. My recipe is at the bottom.)
Pork loin, 2-3 lbs.
Julienned carrots and/or seeded cucumbers, or both. (Red onions are also pretty kickass.)
Fresh, thinly sliced jalapeños
Fresh cilantro
Fresh Thai basil
Mayo

Pork Marinade:

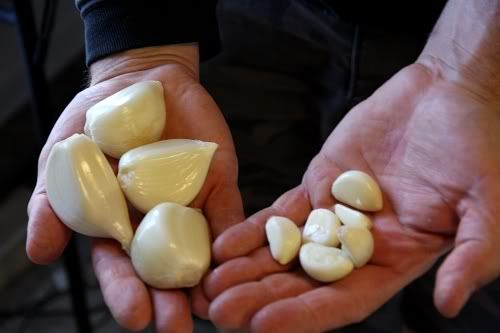
3 stalks of lemongrass
5 fresh kaffir lime leaves
2 thai chilis
1.75 oz fresh ginger
1.5 oz garlic
3 T Lee Kum Kee premium oyster sauce*
2 T Squid brand fish sauce
1 T Healthy Boy sweet soy sauce**
2 t Datu Puti sugar cane vinegar
2 t Sriracha
1/2 c water
1/2 t sugar
1/4 t kosher salt
1/4 t Kwong Hung Seng thin soy sauce
juice from 1/2 a lime


* There's a big difference between oyster sauces. Lee Kum Kee premium is very good, but I think they have a non-premium version as well, which probably tastes quite different. Other 'premium' brands may be good too... but they may not. The main thing you want to look for is that 'oyster' (or 'oyster extractives,' or something like that) is the first thing on the ingredients list. If it's second or third down, it's probably not going to be nearly as good, and you should keep looking.

** HB sweet soy sauce tastes (to me) a lot like molasses, so if you can't find this brand, or something similar, molasses might be a good substitute.


Sauce:

Your favorite cooking oil
2 large shallots, minced
Xiaoxing cooking wine
Kong Yen rice vinegar (A very good brand. Marukan ain't got nothing on it. Should be available at any Asian market.)
Beer

*****


Let's talk marinade first. When we first made this, we just chopped everything up by hand (rather coarsely), dropped it in a bowl and added in the wet stuff. When it came time to cook the pork, we just kind of shook off the aromatics, leaving them in the marinade. What I recommend now is chopping it up just enough so that you can throw it in your food processor and have that do the rest of the work for you. Mince it up nice and fine; you want lots of surface area. But, since lemongrass is very fibrous and likely won't soften up enough during cooking, even that might not be enough for some people. If you think that might be you, I'd use a blender instead, adding enough of the liquid ingredients to just blend it completely, then stir in the rest. Set it aside in a large bowl and go to work on the pork loin. Slice it up small and thin, nice bite-sized pieces. Submerge as much of it as you can in the marinade and let set for at least 2 hours.


Sauce:

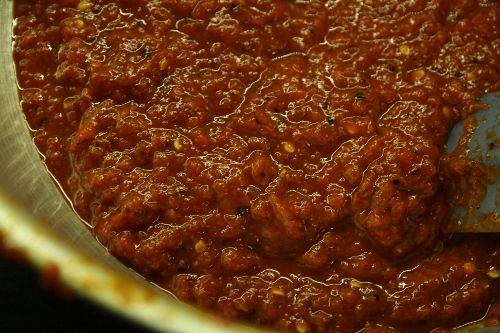
(Originally, we started this in a single pan and then sautéed the pork in the same pan after deglazing, but now I find that kind of impractical, so I do them in separate pans now, adding this to the pork towards the end of cooking as kind of a Bánh mì 'sauce.')

Chop up the shallots and slowly caramelize them using your favorite cooking oil. (We originally used peanut oil, but since then I've been playing around with lemongrass oil and szechuan peppercorn oil.) Take your time with this step. Don't sauté quickly over high heat; you should be able to walk away for 10 minutes and not worry about finding them burned. When they're ready, turn the heat up a little and deglaze with a liberal splash of the Xiaoxing wine, rice vinegar, and beer (we originally used Sierra Nevada Pale, but the last time I made it I used Arrogant Bastard and the two folks who tried it- one of whom was the co-creator- said it was the best so far, for what that's worth). Don't be shy on the amount of liquid, either. A half-cup each is not too much; you're going to simmer it down into a tasty sauce to mix into the pork. Season with a pinch of salt and/or sugar as necessary. When you decide it's ready, either set it aside in the pan, or transfer to a cup or bowl. Ultimately it's going to go in the same pan as the pork and cook down just a little more, so I guess it depends on when you'll be cooking that. When you're ready, get a wok or cast iron skillet and set it on high. You want it hothotHOT. While it's heating up, drain the pork in a colander. A fine mesh sieve is even better- you want as much of the liquid out as you can, so it doesn't splash in the smoking hot oil. When the pan is smoking hot, or just about so, pour in a splash of oil and add the pork. Sear it good, turn the heat down just a little, and then when it looks like it's about halfway done, add in your sauce and turn down the heat to about med-low. At this point, you're mere minutes away from Bánh mì bliss. If you haven't already, now would be a good time to toast your baguettes. When everything is ready, slather the baguettes with a good amount of mayo. Don't skimp, and don't leave it off. The Cohort (Amy) requested no mayo the first few times I made this for her, but this last time she forgot, and I forgot that she doesn't like it on there, so I put it on like normal... And she was blown away. At first, she was none too thrilled that it was on there, and came in the kitchen to remind me that she 'doesn't like it' on there, but just a short time later, after I'd left the house and went out to the garden, she actually called me on my cell phone to tell me how surprised she was by how much she loved it and how it all came together- the 'sauce' combined with the mayo, and everything else- to make the perfect sandwich.

And I was all like, 'Um, duh.'

So yeah, don't leave off the mayo, even if you 'don't like' mayo.


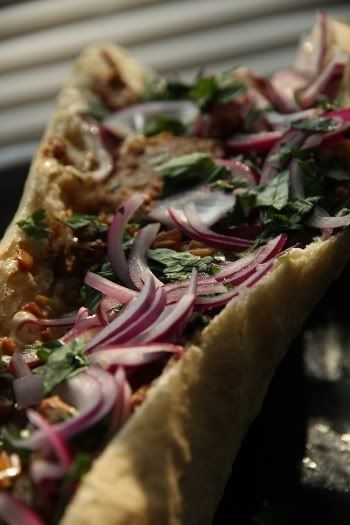
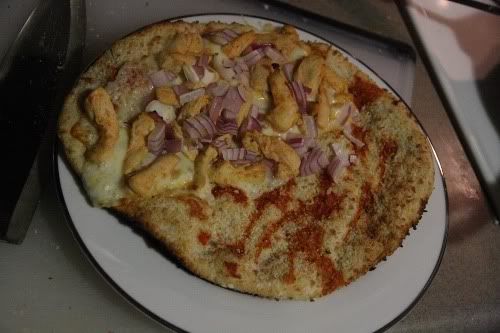
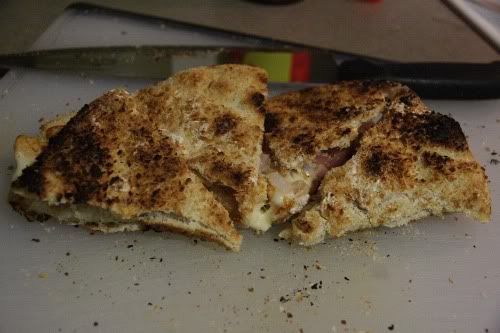
Here's what it looks like:
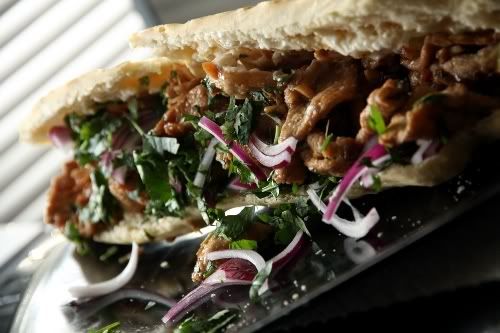


My Bánh mì


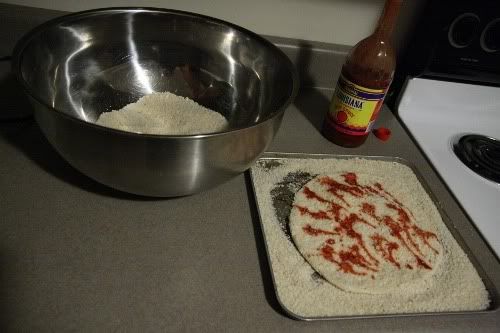
If you need a good baguette recipe (or just a good bread recipe in general), here's mine, which I also posted here before:

  • 2 1/2 cups bread flour
  • 1 tablespoon white sugar
  • 2 teaspoons kosher or coarse sea salt
  • 2 teaspoons instant yeast
  • 3 T wheat gluten
  • 3 T potato starch (not potato flour) 
  • ~ 1 c warm water

 I recommend working it by hand, instead of using a food processor, as it's very, very stiff. Besides, it won't take but a few minutes before it's ready to proof. I also recommend letting it rise at least twice. This recipe makes an excellent flatbread, but for baguettes, after the rise just cut off about 6-7 oz (makes a nice, large-but-not-too-large loaf) and shape. Brush with butter or egg wash if you like, cover with plastic wrap and let rise again. It may not rise all that much this time, but that's a good thing. You want that. Mine didn't rise much before it went into the oven. I didn't think too much of it, just figured it'd finish off while it was baking. But it didn't. At first I was pretty disappointed, and briefly considered making some new loaves with the rest of the dough, but in the end I went with it, and it actually turned out perfect. See, the bread is really just a shell, something to hold all that flavorful pork inside so you don't have to use your bare hands or a fork. It does also contribute some flavor and texture, but you really don't want a whole lot of puffy bread getting in the way of the rest of your Bánh mì.


This recipe is definitely a lot more work than my other one, but it's worth every bit. I also can't stress enough that it's totally worth the effort to make your own baguette. Store-bought, even if it's 'artisan,' just can't compare.

Friday, June 8, 2012

Time To Start Growing Your Own Garlic...

On the left, garlic I planted last fall from some everyday store-bought stuff. On the right, the everyday store-bought stuff. The stuff I planted was *not* elephant garlic, it was just the plain old white kind you see everywhere. The stuff on the right is about average sized; not the biggest I've seen from store-bought, but not the smallest, and these were the biggest I could find out of the package (ready-peeled stuff from the local Asian-mart). Not all of the garlic I planted came out as big as those on the left, but even the smallest ones were larger than the largest ones I could find from the store-bought stuff. What's more, I even let this particular plant go to flower, which I'm told you shouldn't do so the garlic can concentrate all the nutrients on the garlic itself, not divide it up between the bulb and the flower. But I wanted photos...

Growing your own garlic has the added benefit of fresh garlic scapes, which I'm told are fabulous (I've heard garlic scape pesto is amazing). I'm going to find out soon enough myself.


The flower of the home-grown garlic:


Tuesday, May 15, 2012

Quick, Easy, and Surprisingly Good Marinara Sauce

I was totally not in the mood for cooking tonight, so I wanted something super quick and simple. I ended up throwing this together in about 10 minutes with stuff I had lying around. I never would have expected it to be so good.


1 1/2 yellow or white onions, diced
1 red jalapeño, minced
1 can tomato paste, plus water for thinning
Large dash of nutmeg (1/4 t or so)
Heavy splash of cheap white wine for deglazing
Medium splash of red wine vinegar
Salt, to taste
Garlic oil

Sauté the onions and jalapeño in hot garlic oil, deglaze with the wine, add the nutmeg. Stir in the tomato paste and thin to your desired consistency. Add in some red wine vinegar, and salt to taste, and you're good to go.

Super easy, super simple. I didn't actually measure anything out, and even though I say 'Salt to taste,' I just eyeballed it and and tasted it at the end. Turned out so good, I decided to just stop right there. No herbs necessary. Would red wine have been better? I don't know. Probably, but I didn't have any on hand. All in all, though, this turned out to be pretty damn good. I'll definitely be making it again, especially when I'm in a hurry, or being lazy (which is most of the time).

Friday, May 11, 2012

Banana-Coconut Smoothie

I normally don't do smoothies because whenever I try, they always disappoint. Alcohol helps, but usually it just helps me forget how lame my smoothie is. However, tonight I finally made a good one. The first one I've ever made that I actually liked. And as is usually the case whenever I come up with something decent, I didn't try to measure anything out, I just eyeballed it.

This was my second try. My first try came out like they always do: lame. However, I had some bananas and juice left over and I didn't want to just throw them out, so I figured I'd have another go at it. This is what I came up with:

2 bananas, sliced and frozen
1/2 c or so each of pineapple-orange juice concentrate (undiluted) and coconut milk
A pint glass of ice cubes
70 proof coconut rum, to taste (1/2 the bottle should be sufficient)

Dump the juice, coconut milk, and bananas into a blender and whiz away until it's all good and liquefied. Add the ice and blend some more, then the rum. Give it a couple quick pulses and pour it all into a frosty mug and pat yourself on the back for a kick-ass drink.

Monday, April 30, 2012

Bomb-Ass Buffalo Chicken Quesadilla (updated)

This is one of my all-time favorite things to eat, ever, and definitely, hands-down the best quesadilla I've ever had in my life. Just thought I'd throw that out there. Now if only I could take credit for the basic recipe. Unfortunately I can't- I learned to make it during my very first cooking job, back in the late 90's, at a franchise pizza restaurant chain that no longer includes pizza as part of their name. I just checked their website and they still offer a buffalo chicken quesadilla, however, I've not eaten there in years (they don't have any locations in my area, or in my previous area of St. Paul, MN) so I don't know if it's the same as it used to be when I worked there. But that don't matter either way, because after you read this, you too can partake of the Bestest Bomb-Ass Buffalo Chicken Quesadilla in the History Of Ever in the privacy of your own kitchen (or basement or bedroom or wherever), no 'Pizzeria Something Or Other' locations necessary. As a bonus, it's a total cinch to make.

Necessary stuff:

Pizza/bread dough*
Panko bread crumbs
Vinegar based hot sauce (Frank's, Louisiana, etc.)
Red onions
Chicken, preferably grilled
Cheese, preferably Muenster

Tasty Garnishes, if you like:

Salsa
Guacamole
Sour Cream

Let's start with the chicken, just to get it out of the way. Grilled is best, but pan-fried or baked in the oven should be fine too. Sliced or diced, however you like it cut, just be sure and brine it, please. It really makes a world of difference. I rarely, if ever, cook chicken without first brining it. If you're not familiar with brining, it's basically just a soak in salt (and sometimes sugar, as well as herbs) water to help keep the meat from drying out. It doesn't have to be complicated- I usually go with about 1/4 c salt and 1/2 c sugar to 1 gallon of water. Let soak for about an hour, though as little as 20 minutes should be fine too, depending on how much meat you're doing.

Next up, take a ball of your favorite pizza/bread dough (5-6 oz should suffice for a decent-sized 'dilla, though after trying this one for the first time, you may find yourself going much bigger) and press it out in a bowl/dish of panko bread crumbs. It's hard to describe the exact technique, though I think once you get going, it'll come naturally. You can do it in a large mixing bowl, in a cake pan, or even on a square sheet pan. Basically you want some sort of dish to hold in the bread crumbs while you simultaneously press them into the bread dough/roll it out flat. I find working by hand (i.e. don't use a rolling pin) works best.


I started off with the dough ball in the mixing bowl, then transferred it to the little sheet pan. Press and turn, press and turn. Flip it occasionally, keep it covered with plenty of panko. When it's the size you want, it's just about ready to go. Splash it liberally with your favorite hot sauce so it looks like a scene from Law and Order SVU or whatever, and then toast it up. It's best if you have a grill to toast it on, but if not, putting it on a sheet pan and toasting it under the broiler in your oven until it's nice and golden/slightly charred, works fine too.

At this point, you're halfway home. Cover half of it liberally with your cheese of choice (I think Muenster is best- it's what we used back in the day at the restaurant- and I've recently found that Havarti is a great choice, but a cheddar/jack/mozz mix or colby-jack would probably be decent too), add the chicken, sprinkle liberally with some diced red onions (very important! They don't necessarily have to be red onions, but don't leave these off. I did one time, because I didn't have any, and the difference was profound, profound I tell you!  If you don't like onions or whatever, put them on anyway. You'll somehow like them on this, I promise. Guaranteed, or your money back), and maybe some more cheese and hot sauce on top. You're pretty much home free at this point. Pop it in a very hot oven (400+) until everything's melty/toasty. Shouldn't take more than 10 minutes, tops. Probably 7-8 or so.


Perforate the center of it along the cheese with a knife edge, then fold it over and cut into 4 (or 3 or 2) wedges:


At this point, I like to douse it liberally with Louisiana hot sauce and chow down (Frank's used to be my favorite vinegar-based hot sauce, but since I've tried Louisiana, I'm a convert). I'm not a huge fan of sour cream, but I can see how it would be good on this if you like it, and salsa and guac definitely make for great condiments.


* if you don't have a decent recipe for pizza/bread dough, I've got one I love and use pretty much every time. I was looking on allrecipes.com for a baguette recipe, and found one but used it to make flatbread instead. It was the best flatbread I'd ever had. So I ended up messing around with it and making it even better. Here's my version:
  • 2 1/2 cups bread flour
  • 1 tablespoon white sugar
  • 2 teaspoons kosher or coarse sea salt
  • 2 teaspoons instant yeast
  • 3 T wheat gluten
  • 3 T potato starch (not potato flour) 
  • ~ 1 c warm water
(For what it's worth, for the wheat gluten and potato starch, I use Bob's Red Mill brand.)

Mix all the dry stuff, then add water until a nice dough forms (you should only need slightly less than 1 cup). Because of all the extra gluten involved, this dough will quickly become pretty stiff and hard to knead. And for that reason, I wouldn't bother using a food processor to mix it up. Once you've got the dough ball, it should only take a few minutes of folding and kneading before it gets too stiff to bother with anymore, so to me it's not worth it to get out the food processor just to save a few minutes' work. Plus, unless you've got a super-duty Robot Coupe or something similar, it'll probably just bog down anyway. When it's ready, cover it and stick it in a warm spot for a few hours. I usually let mine rise at least twice, and sometimes I'll let it go all day or overnight while rising.

This recipe makes the best flatbread I've ever had, and it's my go-to recipe every time.


Saturday, April 7, 2012

As seen on a bag of Krunchers Jalapeño chips...


Artificial parsley? 'Cause the real stuff is just so damn expensive, or what?

Tuesday, March 6, 2012

Persian Stew With Goat and Omani

Ok, as mentioned in the previous post, I got the idea to try this out when a friend mentioned to me that he'd been to a Persian restaurant here in town and had this stew (not a soup like I said) made with dried limes and that it was amazing. 'Dried limes' was all I needed to hear. I love trying out new foods from various parts of the world that I'll never actually go to, so I immediately started looking around online for more info on them. Basically I just checked Wikipedia and thought ok, cool, let's do this. So I got me some dried limes and looked up a few Persian recipes here and there to get a feel for what went in a Persian dish, and then I got me some goat and 12 beers and came up with a winner of a recipe on my very first try. And while I do think this recipe is a winner, I'll be honest, it's not going to win me any Iron Chef competitions, and I'm certainly not expecting any Persian restaurant owners to be calling me anytime soon asking me for my secrets; but it is pretty damn good. In fact, a friend of mine who's not a vegetarian, but for some reason that none of us really understand hasn't eaten any mammal in 15 years, ate some of my goat stew that night. And liked it. And all my other, normal, friends that were over that night really liked it too. But most importantly, I liked it. If I'd had it at a restaurant, I'd order it again, as well as recommend it to my friends.

Here's what you'll need:

2 lbs. goat meat
2 oz minced garlic
1 oz minced ginger
4 dried omani limes
1 bottle of apricot ale
1 oz dried apricots, chopped
2-4 sun dried tomatoes, chopped
12 cardamom pods
3-4 star anise
1 cinnamon stick
1 T annatto
1 T turmeric
1 T fenugreek
1 T dried rosebuds (can be had from Whole Spice)
1 1/2 t green peppercorns
1 1/2 t pink peppercorns
1 1/2 t coriander seeds
1 t cumin
1 t szechuan peppercorns
1/4 t nutmeg
1/4-1/2 c chick pea flour (besan) roux
Red bell peppers/onions/carrots, diced
Balsamic vinegar for deglazing
Fresh fenugreek leaves, cilantro, and/or mint for garnish


 If you've never had goat before, it's worth a try. It's not gamey or strong-tasting at all. It's kind of hard to describe what it is like, so I won't even try, but if you like beef, you'll probably like goat. It generally has lots of bones in it (sharp ones, too) and is pretty tough, so you'll want to either use a pressure cooker or let it stew a long, long time. I opted for the pressure cooker to get it started, and then let it stew for a little less time (two hours, I think). If you can't get (or don't want) goat, then beef will work just fine.

The first time I made this, I seared the goat in the pot first and then added everything else after that, but because of the crazy amount of bones in the meat, I think a better approach is to treat it like you're making Pho- put the meat/bones in a large pot and cover with a couple inches of water; blanch for about 5 minutes and then drain. Here's where the pressure cooker comes in super handy- like 'if I didn't have one, I'd buy one' handy. Put the blanched meat/bones in the pressure cooker, cover with a couple inches of water and let it get up to full pressure, then turn the heat down and let it cook on low pressure for 15-20 minutes. Release the pressure however you want, then drain and save the liquid. When the meat cools, you can fairly easily pull all the meat off of the bones. Goat really is pretty tough, so if you don't have a pressure cooker this step will take quite a bit longer. Or you could just use beef. Or lamb, I guess. But this is my recipe, so goat it is. Before you return the meat and reserved liquid to the pot, pour in a little olive oil and sauté the garlic and ginger in it. Next add in the turmeric and let cook for about 20 seconds, then deglaze with some balsamic vinegar. (The first time I made this recipe, I added the turmeric directly to the pot full of liquid, but it clumped up and was hard to mix in thoroughly. The second time I made it, I added it to the ginger/garlic sauté and it of course worked much better. Coincidentally, I've since read that you're supposed to do it that way with turmeric anyway.) I used 'pomegranate infused' balsamic for the deglaze, just because I had it on hand, but I don't think it's anything special, at least this brand (Pompeian). I think next time I might just use regular balsamic and add pomegranate molasses to the stew while it's cooking. When the garlic/ginger/turmeric is ready, add in the goat and reserved cooking liquid. At this point the goat is only covered by an inch or two of water so you'll definitely want to add more. But the thing is- and this is why I really shouldn't start drinking until after I'm done working on a new recipe- I can't remember how much I used. I made it in an 8 qt. pot, and I think I filled it to about the halfway point. It probably doesn't matter much anyway; it's going to have to stew awhile, so you can likely get away with too much water- just let it reduce more. But for now, filling the 8 qt. pot to about halfway is my recommendation.

Next, drop in your dried limes, but pierce them in at least two places first. An instant-read thermometer works well for this. Add in your dried apricots, sun-dried tomatoes, and apricot ale. (You can probably get away with using more sun-dried tomatoes than what I used; I went with two because the ones I got- from the same international market where I got the goat- were not like 'regular' sun-dried tomatoes; these were dark, almost black, and very, very salty. If I'd been using the kind you see at most grocery stores I probably would have used several more.)

Now, don't make the mistake I did the first time I made this and just add your cardamom pods, star anise, and cinnamon stick right into the pot. That makes for a lot of hassle later on when you're constantly biting down on woody, chewy bits; toss them in a spice bag before adding them to the pot. I highly recommend the nylon ones that you can find at any homebrew shop, since they're almost always bigger and way cheaper than the cotton ones specifically designated as 'spice bags.' Add in the rest of the spices. If you're using whole spices (which you should be) you'll definitely want a coffee grinder, or at least something other than a mortar and pestle to grind them; most of them are no problem, but annatto seeds are hard. Really hard. I gave up after about 5 seconds in the mortar. Just wasn't worth it.

Once you have all that in the pot, bring it just to a boil, then turn it down to a simmer and let it go for at least an hour. At some point, maybe about 45 minutes into it, get your chickpea flour roux going. Don't use regular flour. It'll work, probably, but besan is so much better in this. It has a great, nutty flavor and really adds a lot of depth to the dish. Before I added the roux, I tasted the stew and was a little iffy about it. It wasn't bad at all, but really needed something. Turns out what it needed was the besan roux. Be aware that besan needs a bit more time to cook than regular flour, since it's very, very raw tasting. You'll definitely want to taste it before adding it to the stew, just to be sure. When it's ready, mix it in and let it simmer for 20-30 minutes or so, then give it a taste. At this point, the dish is still (probably) around 45 minutes away from being done. (Taste a piece of the goat to really get a better idea- chances are, you can go quite a bit longer and it'll be fine. What you don't want to do is overcook the veggies.) When you figure it's about 30 minutes away from being done, sauté your carrots/peppers/onions, deglaze with more balsamic, and then add them to the pot. Notice I didn't specify an amount. That's because I was too busy drinking at the time to bother remembering to do that. But it's not exactly critical- 1, or maybe 2, of each should be plenty. If you happen to have any chick peas lying around, those go well in this too. When the goat is nice and tender, and the veggies too, you're good to go. (Be sure and fish out the limes. Or leave them in if you feel like playing a joke on someone. They'll be nice and mushy and the color will blend in with everything else, so they'll almost surely go unnoticed. Especially if it's at night and you're trying to impress a date by candlelight.) Goes well by itself, but is good with flatbread, or especially over rice. Fresh fenugreek leaves make a nice garnish, if you can find them. They don't have an especially strong flavor, but they smell like snap peas, or fresh garbanzo beans. (The Cohort thought they smelled like walnuts, but I didn't really pick up on that.) If you can't find them, fresh sesame leaves are awesome too. Lacking that, mint is nice, and cilantro is especially good.


Saturday, February 25, 2012

"Goat and shriveled up black lemons. It's what's for dinner."

So said Amy on her Facebook page. And it is what's for dinner today. See, awhile back a friend of mine (who's great Thai Drunken Noodle recipe will be featured here in the coming months) told me about a fantastic soup he'd had at a local Persian restaurant. Said it was made with dried limes. The gears in my head started whizzing, one thing led to another, and now I've got me some dried lemons (or limes, I'm not sure which; I've read that even though they're sometimes labeled as lemons, they're actually limes) and some goat, and I'll be whipping up my own version of a Persian stew.


Photobucket

Omani/Dried lemons


They weigh next to nothing. My understanding is that they're made by first boiling the limes in salt water and then putting them out in the sun to dry. Needless to say, I probably won't be trying a homemade version of these, especially since they're so cheap- around $5-6/lb. The tan colored ones are about the size of a nutmeg; the black ones are slightly larger. The tan ones smell, as you'd imagine, citrus-y. Lemon-y. The black ones have a similar citrus-y smell, but much more of a deep, robust background, almost raisin-y. I had planned on using the black ones originally, but after my first taste of goat today (seared in a hot skillet with a pinch of salt; it tastes somewhat similar to beef to me, but lighter and with a subtler flavor. Also tougher.) I think I'm going with the lighter-colored ones. Being that I've never even had Persian (Iranian) food before, this ought to be interesting. I'm planning an update sometime next week (hopefully with an actual recipe, or something like one).

Monday, February 6, 2012

Stuffed Red Bell Peppers, Two Ways (Part II)

Ok, at long last The Cohort has written her version of the stuffed bell pepper throwdown! As you'll see, we have differing recollections of how things went down in the Asian market, but this is Amy's guest post, so aside from some very minor editorial suggestions, I'm leaving it virtually untouched.

Take it away, Amy!


*****


So, as John mentioned in the previous Stuffed Bell Pepper post, he and I were prancing about in the local international food store, K&S, when I saw the most stunning red bell peppers from afar. Immediately, angels began singing and wind started blowing through my hair as I pointed in slow motion to the marvelous display. John's jaw dropped and tears came to his eyes when he saw their beauty. Upon arriving at the pepper display, I knew at that moment what we should do with them: Stuffed Red Bell Pepper Throwdown. Neither of us had made them before, and any I had ever seen in the past were green and looked like a baby had done its business in them. When I mentioned the throwdown idea to John, he instantly dropped to his knees and thanked me for having such a brilliant idea, but also said he was afraid of losing. He begged me to be easy on him, but I told him to suck it up and take his loss like a man. He really started to sob at that point; he was making a spectacle of himself. People were starting to gather around us, so I quietly assured him I wouldn't break out the big guns so he would have a chance at winning. So, we made our purchase and went home to start the war. (By the way, I totally broke out the big guns. You have to when competing against John, yo. He is serious competition!)

Our basic ingredients were similar: we both used red bells, of course, and we both used sausage instead of beef. I had done a bit of research about stuffed bells, and every recipe I saw had beef. Beef has its place, but I thought in the peppers its only purpose would be texture. So, while we were shopping, I suggested we use sausage instead. We decided to go with regular ol' Jimmy Dean sausage, rather than getting anything flavored; we wanted all the flavors of the stuffing to be our creations. We also both used onion and garlic, and a few other spices as well. Our recipes turned out to be quite similar to each other's, but in the end our minor differences really made for unique taste experiences.

My ingredients were the following (any herbs listed here were fresh):

4 red bell peppers, tops cut off
1 lb regular Jimmy Dean sausage
rice vinegar for deglazing
1 ½ – 2 cups slightly undercooked rice
¼ cup of diced red bell peppers (from the tops)
1 small yellow onion, or ½ large yellow onion, chopped
10 garlic cloves, minced
¼ cup green onion, chopped
¼ cup Thai basil
¼ cup cilantro
2 tbsp Sriracha
1 can diced tomatoes, drained (I used Hunts with no added salt)
4 tbsp soy sauce (only use LaChoy if you are a complete idiot)

The spices I used were the following (any herbs listed here were dried):

3 tbsp dried sage leaves
3 tbsp parsley
1 tbsp Hungarian paprika
1 tbsp granulated garlic
1 tbsp onion powder
1 tsp cayenne pepper
1 tbsp oregano
1 tbsp thyme
1 tsp chili powder
1 tsp sumac
a pinch or two of coarse sea salt (none of that iodized crap)
2 or 3 turns from the black pepper grinder

And then the finishing touches:

1 tbsp sour cream powder (this turned out to be the ingredient that really made these peppers awesome.)
¼ cup bread crumbs (I don't recommend getting any kind of crazy flavored crumbs. Just get plain ones.)
4 tsp of unsalted butter (and I mean butter, not Blue Bonnet, not margarine. BUTTER, people. There is no substitute.)

That looks like a lot of ingredients, yeah? I guess it kind of is. But I'm telling you, it's worth it. You have never in your whole life ever had stuffed peppers as delicious as these. Well, except for maybe John's, but I am speaking the truth when I say they were equally spectacular. We were both so amazed at each other's creations, there was just no way to pick a winner. Anyway, let's cook these bitches, shall we?

First, preheat your oven to 400 F. Get a large pot, one you would make a big batch of chili in, and fill it a little over half with water. Salt it with 2 or 3 generous pinches of coarse salt and bring it to a boil. While you are waiting for the water, you can prepare your vegetables and fresh herbs; chop that shit up! Now, be sure when you cut the tops off your peppers to cut out the veins and remove the seeds. You probably already knew that, but some people... Anyway. Once your salted water comes to a rolling boil, remove it from the heat and drop your peppers in. Leave them there until you are ready to stuff them.

In a skillet, crumble up your sausage and brown it completely. Drain the fat off, and rinse the sausage in a colander. Then, deglaze the pan with about 3 tbsp of rice vinegar. You might want to use a bit more or less, depending on how much of the sausage is still stuck to the pan. Now, don't go and rinse that out. There is lots of flavor in there! Return the sausage to the pan on medium-high heat. Next, get your dried sage leaves. You should have a nice palm full. Then, rub them vigorously between your hands and drop them into the sausage. Please, for the love of God, watch out for stems! That wouldn't be pleasant to bite down on later! Then add your onion and red pepper. Continue cooking until the vegetables are tender, then add your garlic. Cook for 2 more minutes, then add parsley, green onion, thai basil and cilantro. Cook for an additional 2 minutes, then reduce the heat to medium. Add the tomatoes and rice. (As far as cooking the rice goes, I recommend cooking that in advance. Just use the package instructions, or if you want to be super awesome, use a rice cooker like we do. If you don't have one, get one right now. It will be one of the best investments of your life.) Stir the rice and tomatoes in with the sausage mixture until it is blended well.

Ok, here is where the magic happens. Add the rest of the dried spices, which are salt, black pepper, paprika, granulated garlic, onion powder, cayenne pepper, oregano, thyme, chili powder, and sumac. Stir it all together, then add the Sriracha and soy sauce. Oh yes, it smells like Heaven now, doesn't it? I bet you want to rub that shit all over your body. Well, don't do it yet. Wait until the peppers are stuffed, then you can do whatever you want with the leftover mixture. If you find the concoction to be a bit dry, you can add a bit more soy sauce. Don't make it too wet, now. Then it will be a soggy mess you will be embarrassed to serve. Basically, you don't want any excess liquid, but you don't want the mixture to be crumbly. It should be just wet enough so it sticks to itself. Now, have a taste. Isn't it grand? Or perhaps you think it needs a little more pepper, or whatever. If you feel it needs a little something, go ahead and add it. All I'm gonna say is this: you really shouldn't have to add anything. This stuff is almighty bad-ass awesome.

Ok, now let's stuff those peppers! Take them out of the pot and shake the water off and out of them; you don't want any excess water to be inside the peppers when you stuff them. Put them in a 13 x 9 glass baking dish. Sprinkle the insides with salt and black pepper. Then stuff the peppers with that super luscious sausage and rice mixture you just made. Pack them nice and full, and level them off so they are flat on top. Then, sprinkle the top with some sour cream powder. Don't use too much, just a light sprinkle should do the job. Then put a thin layer of bread crumbs on top of that. By thin, I mean about 1/8 inch. Not much. Then put one pat of butter (1 tsp) on top of each pepper. This will make the crust nice and crunchy and golden brown. Put them in your preheated oven for 25-30 minutes, or until the tops are, like I said, golden brown. Then, take them out and let them cool for five minutes. The finished product should look like this:


This is what a stuffed bell pepper should be. I really think red is the only way to go; the sweetness of the pepper really makes this something special. I would like to try yellow sometime too, but I don't think green could ever compare.

Here is a shot of the inside:


Well, now you have seen both of our recipes for the almighty Stuffed Red Bell Pepper. I suggest you try making them both so you can judge for yourself: whose pepper is better? We certainly can't decide! They are both that damn good.